Entra ID Integration
Entra ID Syncing – Overview

Dynasend can import people and groups from Microsoft Entra ID (formerly Azure Active Directory). For the full chooser across Graph, SCIM, Google, and CSV, see Importing people.
Azure SCIM vs Microsoft 365 directory
- Microsoft 365 directory — Global Administrator consent; Dynasend pulls from Graph. See Microsoft 365 directory sync.
- Azure SCIM (this page) — Entra pushes users and groups to a Dynasend SCIM server on a schedule (about every 40 minutes while provisioning runs).
If both cover the same email, SCIM owns that signature.
One-way sync
Dynasend receives data from Entra ID. Dynasend never writes directory data back to Entra ID.
Source of truth
Form field precedence controls whether directory values or user edits win on a given field. Map SCIM fields in Form Builder with SCIM mapping and precedence. Map Graph sync with Microsoft 365 directory fields. Entra profile photos sync only through Microsoft 365 directory (not SCIM); map the Photo upload field to Photo. See form setup and Directory photos.
Groups and removals
- Entra groups sync into Dynasend so you can target banners and routing by group.
- When Entra removes a user, Dynasend removes or stops updating that person on the next successful sync for that connector. Soft-deleted Entra users can linger; see the FAQs.
Entra ID SCIM Setup & Provisioning – Dynasend Side
For directory sync without a SCIM push job, use Microsoft 365 directory sync instead.
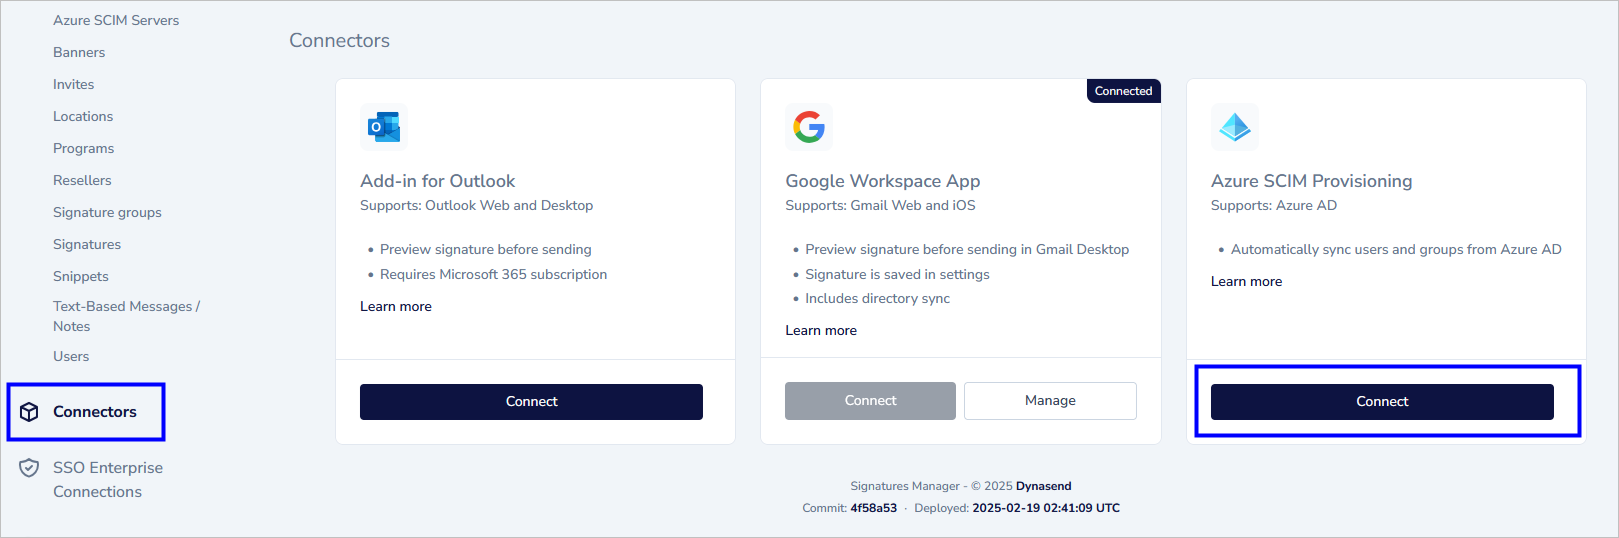
When logged in as a developer, click connectors and then Azure SCIM Provisioning:
The initial configuration requires you to make a few choices (these can be changed later if needed):
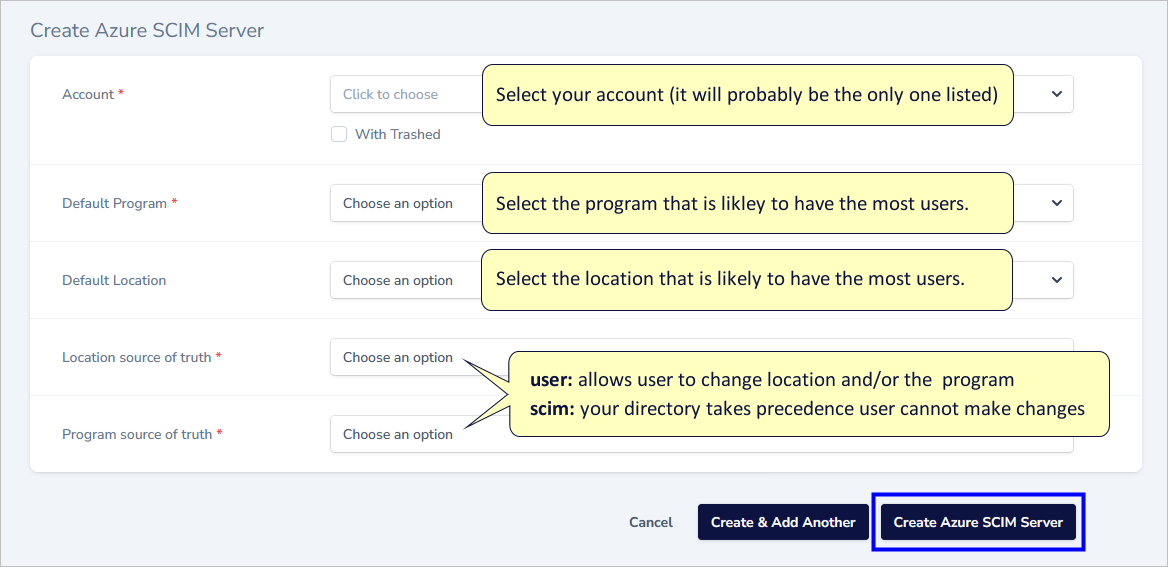
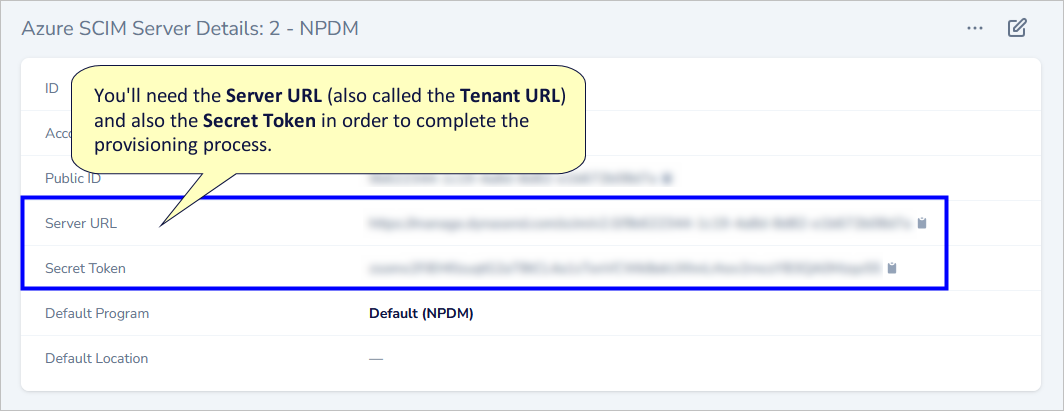
After clicking Create Azure SCIM Server you'll be given your Tenant URL and your Secret Token:
If you have multiple tenants you should set up multiple SCIM servers, one for each tenant.
Entra ID Provisioning Instructions – Tenant Side
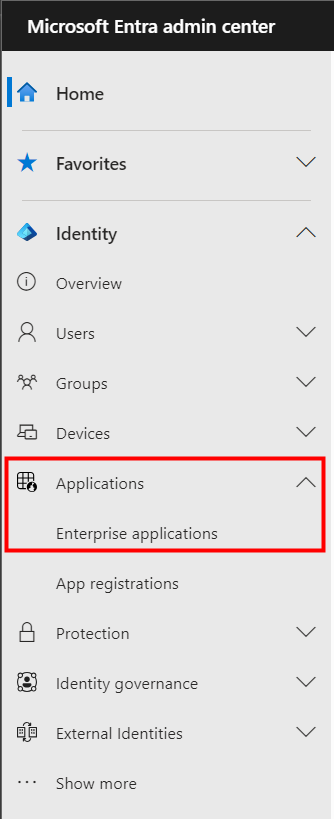
(1.) Begin by creating a Dynasend Enterprise application in the Microsoft Entra ID (formerly Azure AD) portal. From the Microsoft Entra admin center left-hand menu, expand “Applications” and choose "Enterprise applications".
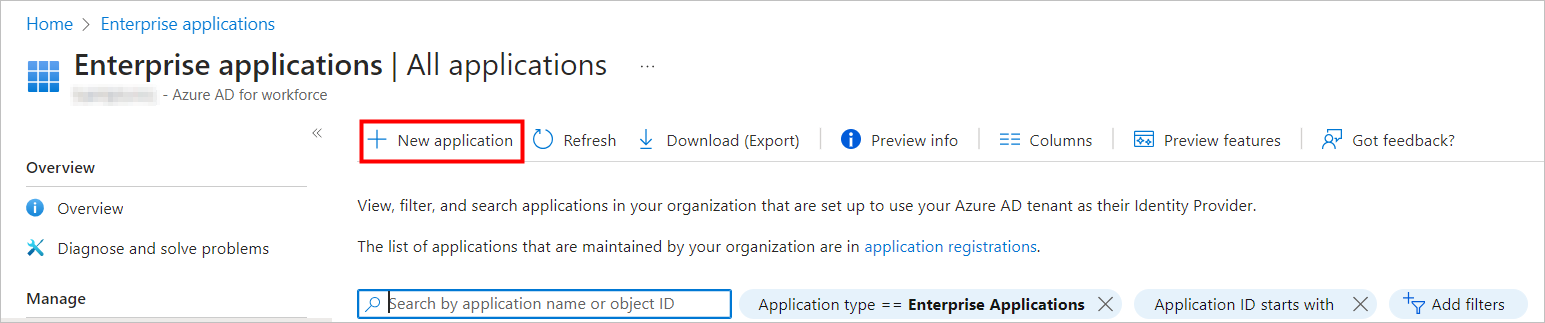
(2.) From the top menu, choose "+ New application".
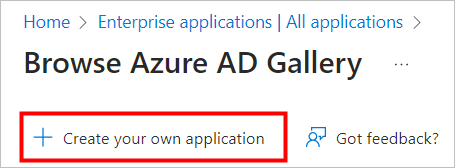
(3.) From the top menu, choose "+ Create your own application".
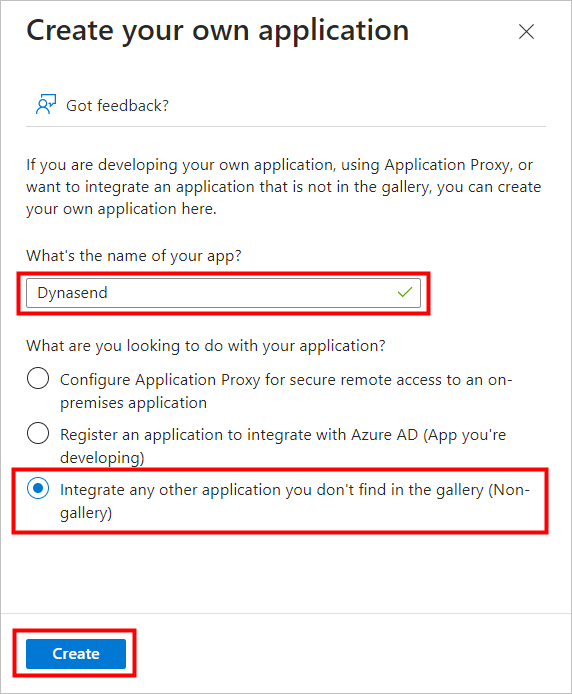
(4.) In the fly-out menu that appears to the right, enter "Dynasend" (or a different name if you’d prefer) in the text box labeled "What's the name of your app". Leave the default radio button for "Integrate any other application you don’t find in the gallery (Non-gallery)" selected, then click the "Create" button.
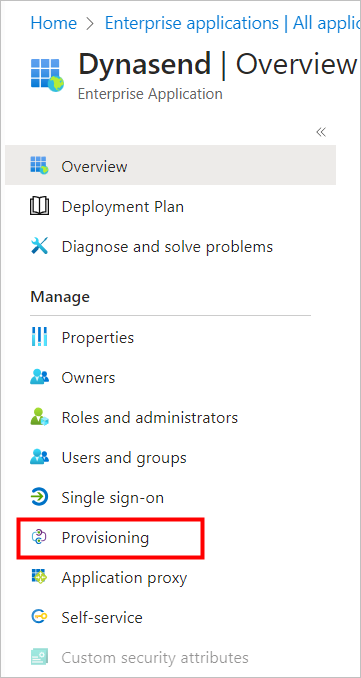
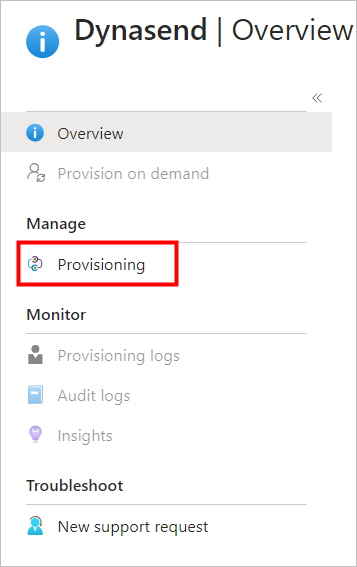
(5.) After the application has been created, in the "Manage" section, select "Provisioning" from the left-hand application menu.
(6.) From the application provisioning page, under the "Manage" section, select "Provisioning" from the left-hand provisioning menu.
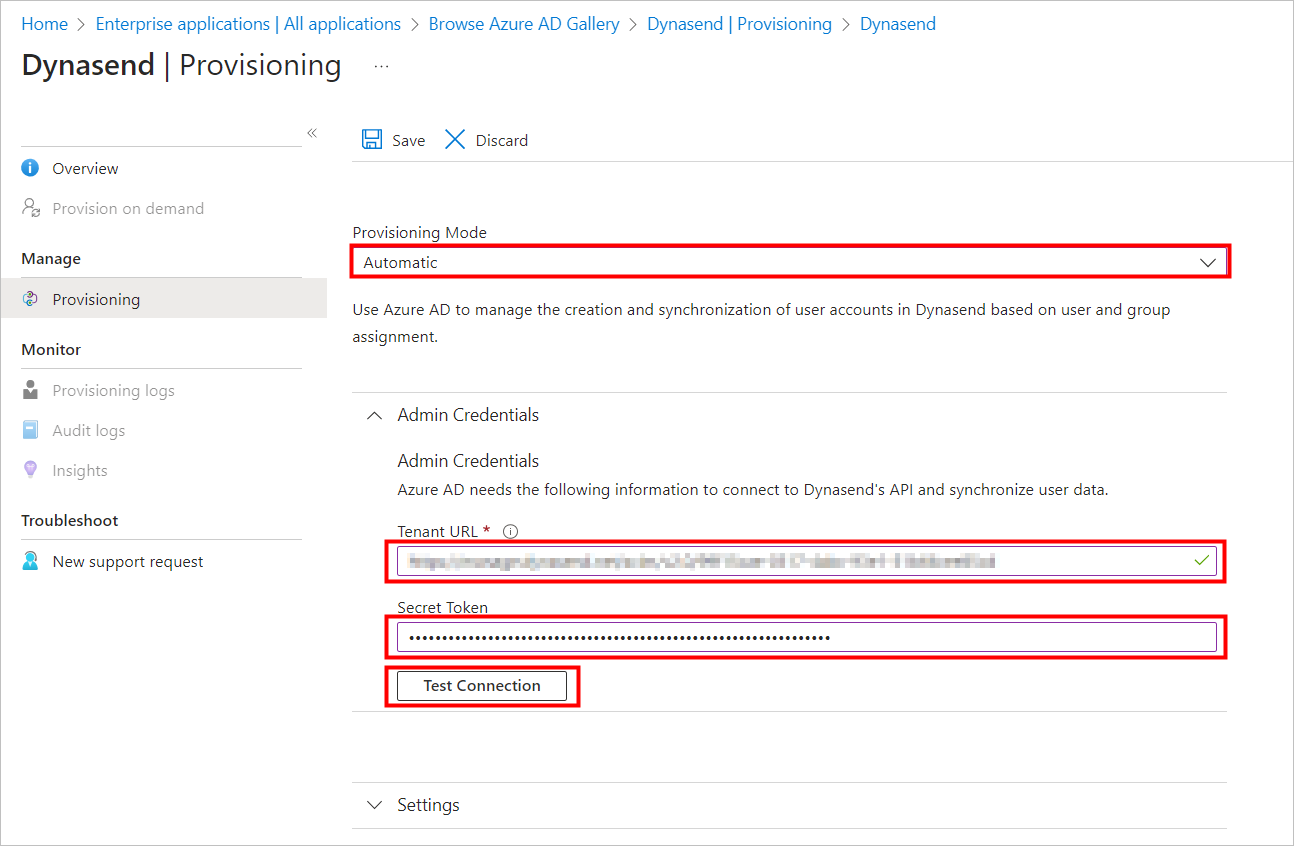
(7.) In the "Provisioning Mode" drop-down list box, select "Automatic". In the Tenant URL and Secret Token text boxes, enter the information that you have been supplied by the Dynasend team. Click the "Test Connection" box. If the test returns successful, click the "Save" button from the top menu.
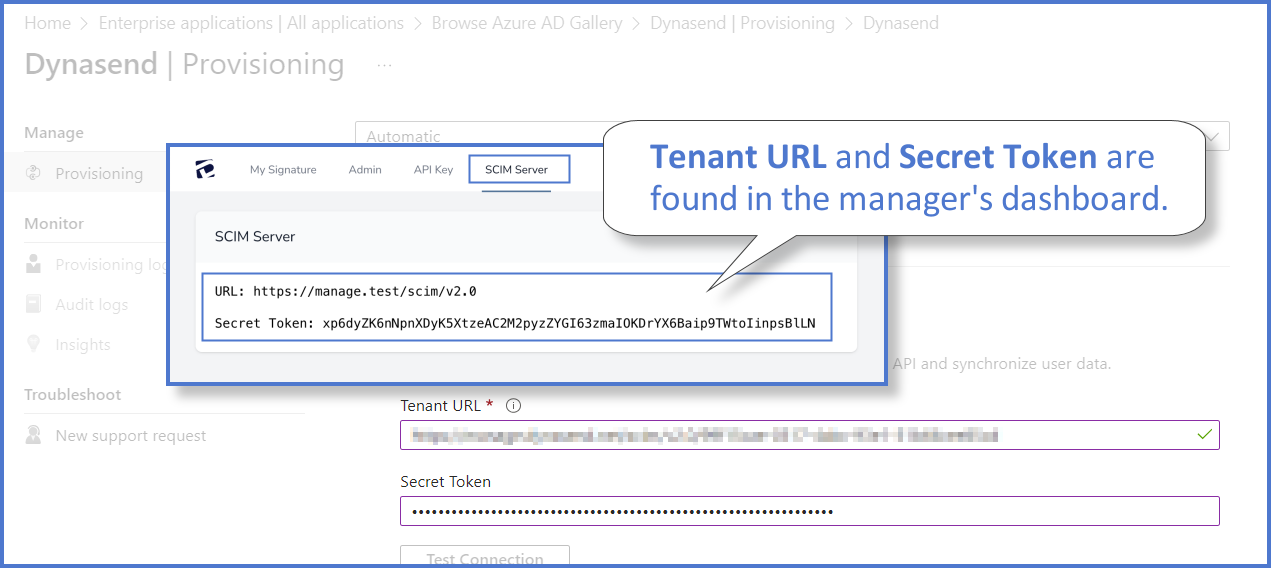
Note: You can also find your tenant URL and secret token in the SCIM Server tab of your Dynasend dashboard:
(8.) On the Provisioning left-hand menu, choose "Overview", then choose "Provision on demand" from the top menu.
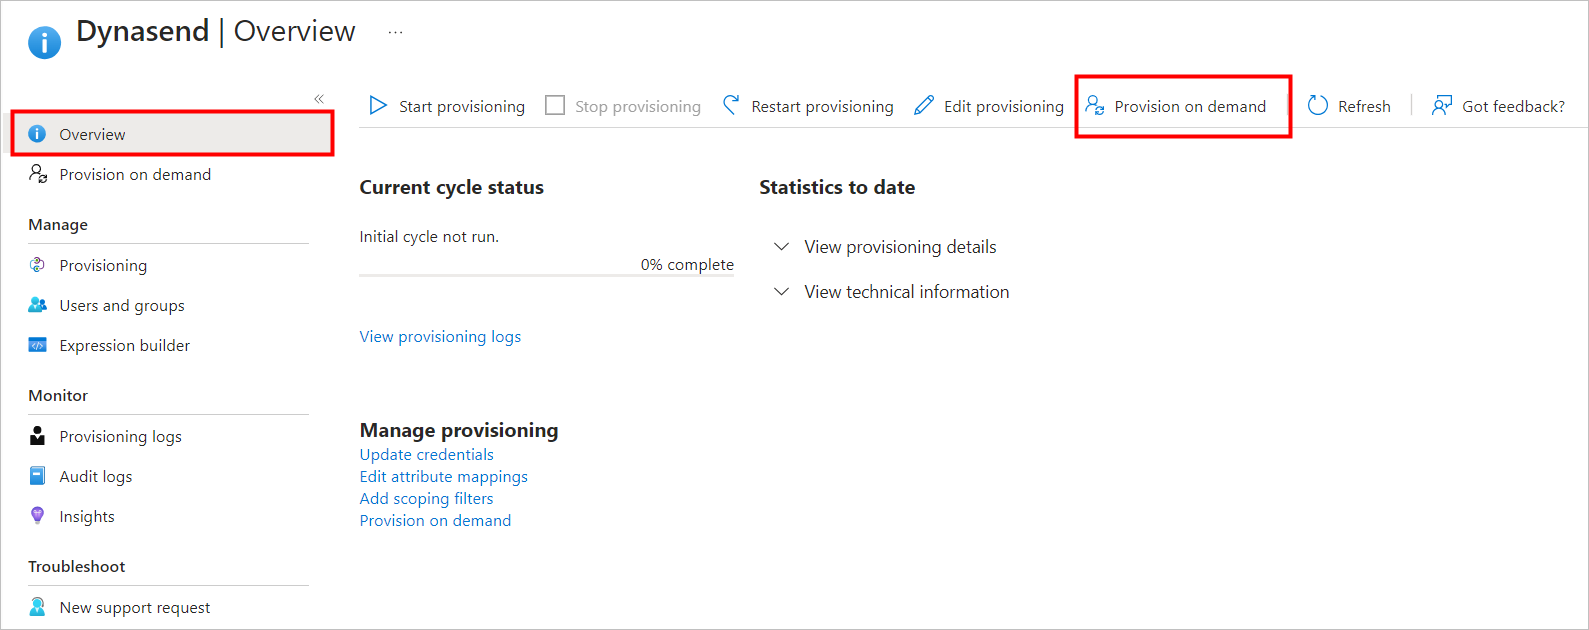
(9.) Verify that a single user can be provisioned successfully, then choose "Start provisioning" from the top menu.
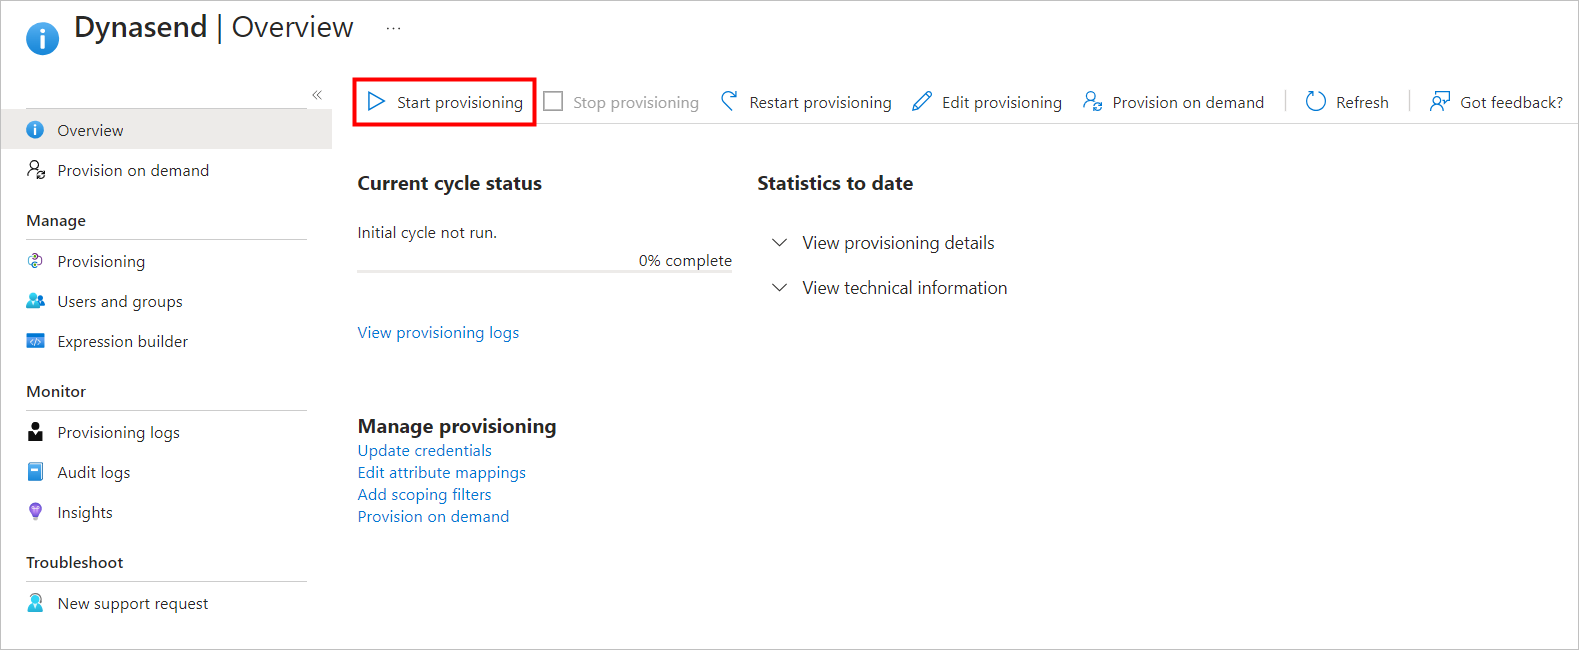
For more information see the Microsoft Support articles: What is automated SaaS app user provisioning in Azure AD? and Attribute-based application provisioning with scoping filters.
(10.) To make all users visible to Dynasend, one more step must be taken.
Note: If you don't already have an Active Directory group containing all mailbox users, create a group in Active Directory called "Dynasend" or "All Users" and add all mailbox users to it. Then wait for that group to sync up to Azure.
Then, within Azure, for the Dynasend service principal under that Provisioning section, click USERS AND GROUPS and then click ADD USER/GROUP and then add this group of all users from Active Directory:
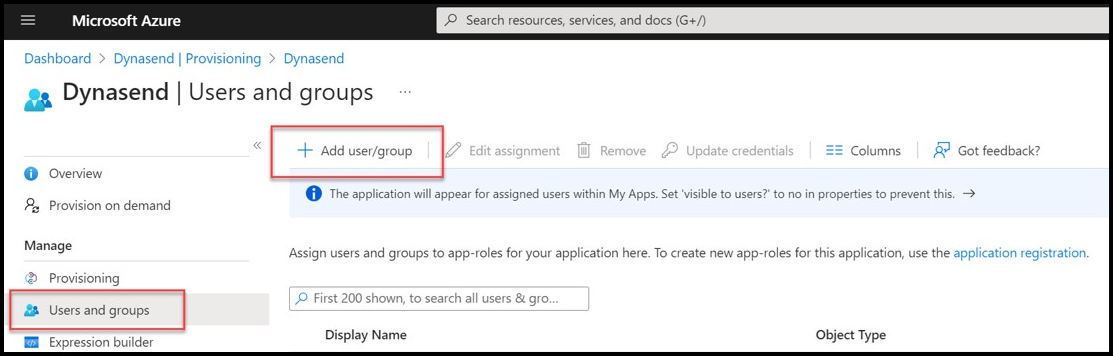
This will complete the process of sending data on all users to Dynasend.
Two Final Checks
Here are two final things we recommend that you do to ensure that the configuration is correct and is running.
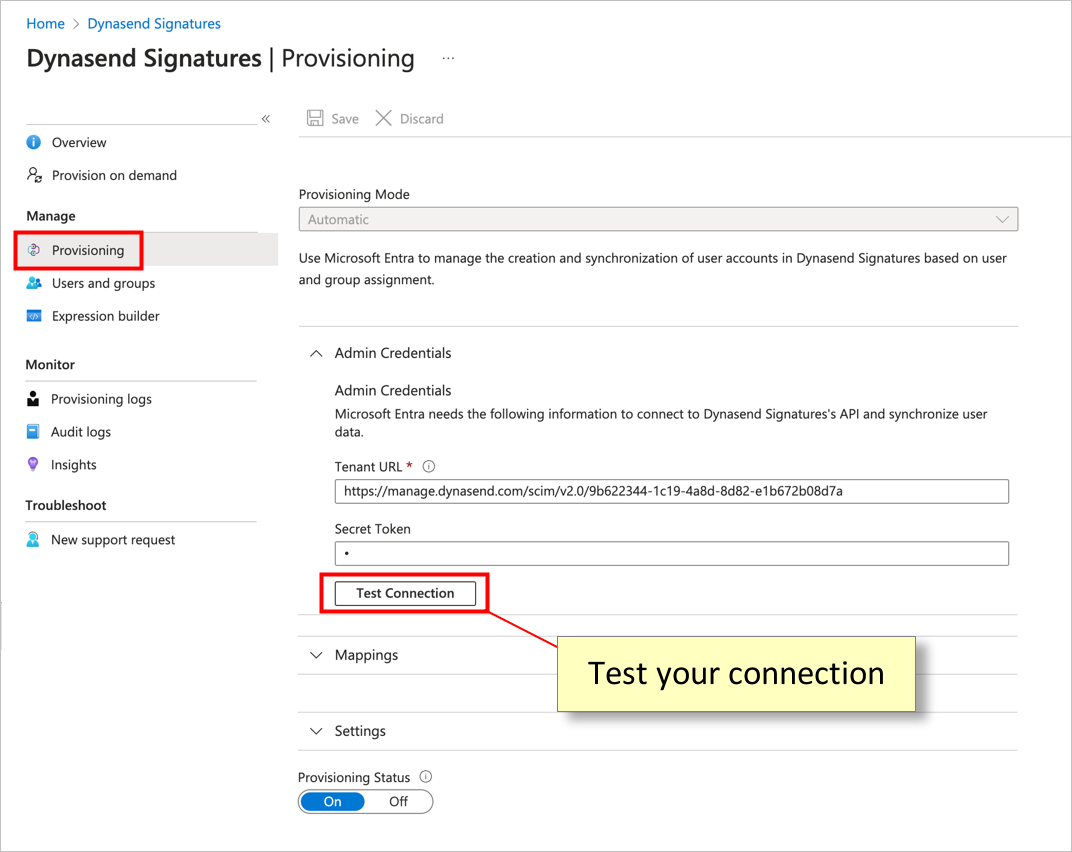
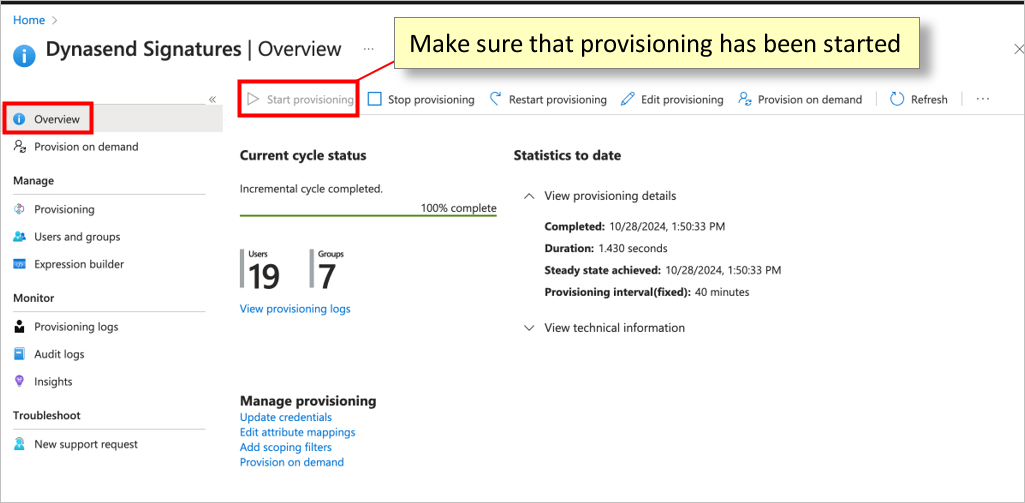
After completing the provisioning process, please email us here and let us know that your SCIM provisioning has been completed. We will then complete the final field mapping, so that your data sync is flowing properly.
Caveats
Nested Groups
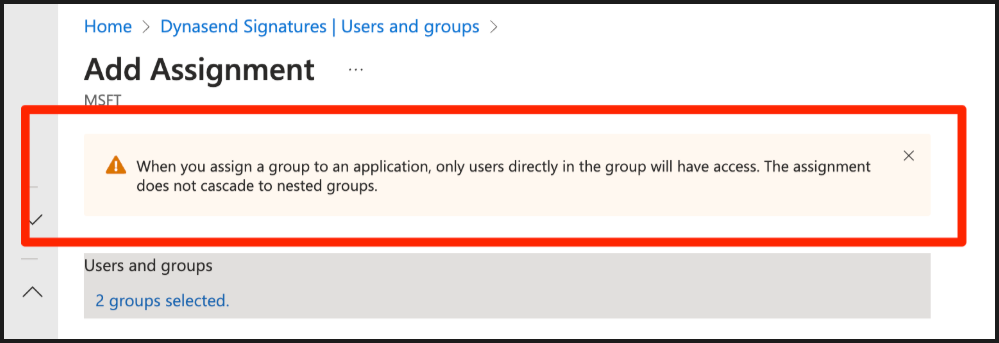
Microsoft states the following:
When you assign a group to an application, only users directly in the group will have access. The assignment does not cascade to nested groups.

SCIM Server Data Routing – Dynasend Side
If you have multiple Dynasend programs and/or multiple locations, it will be necessary to create routing rules to properly route your AD data. The process is quite straightforward:
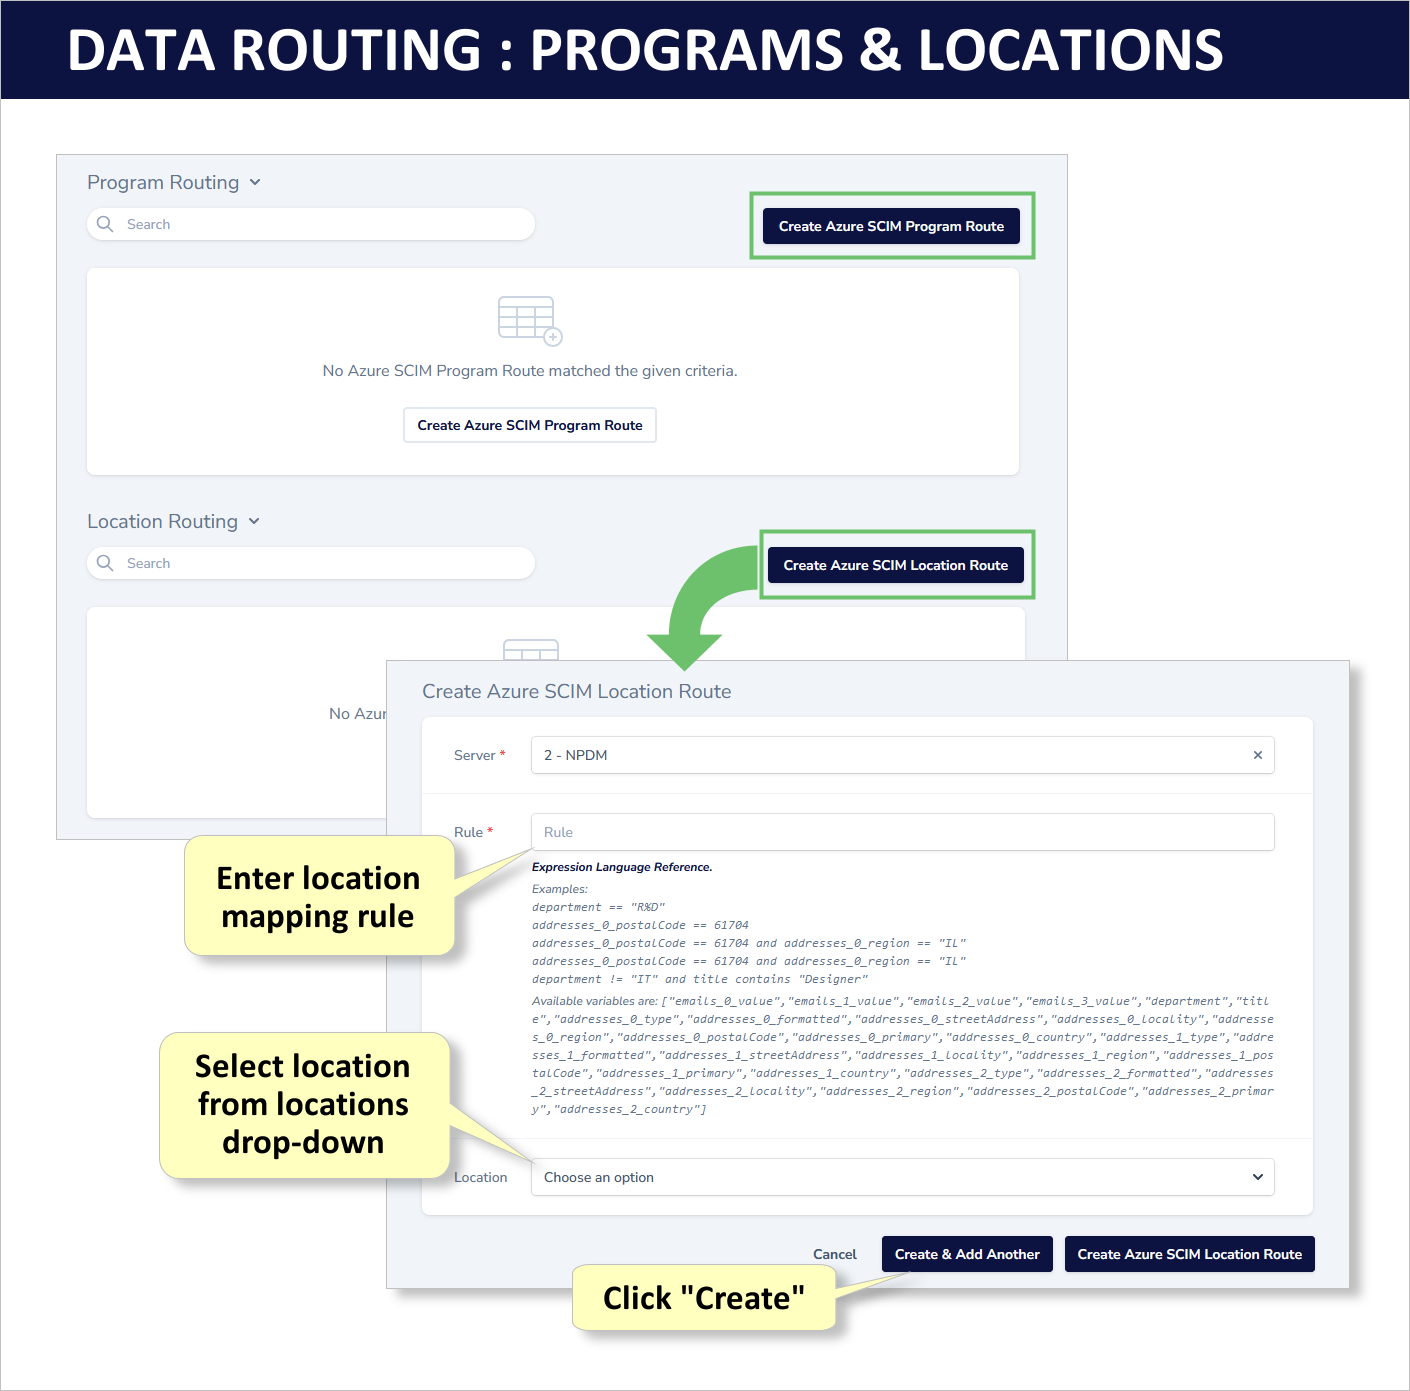
Examples include:
- Program Routing Rule: emails_0_value ends with 'farragutgroup.com'
- Location Routing Rule: addresses_0_locality == 'Silicon Valley'
- Compound Routing Rule: addresses_0_locality == 'Boston' and emails_0_value ends with 'motrude.com'
Note that you can use multiple rules (each created seperately) for the same location or program. For example:
- addresses_0_locality == 'St Louis' --> maps to St. Louis
- addresses_0_locality == 'St. Louis' --> maps to St. Louis
- addresses_0_locality == 'Saint Louis' --> maps to St. Louis
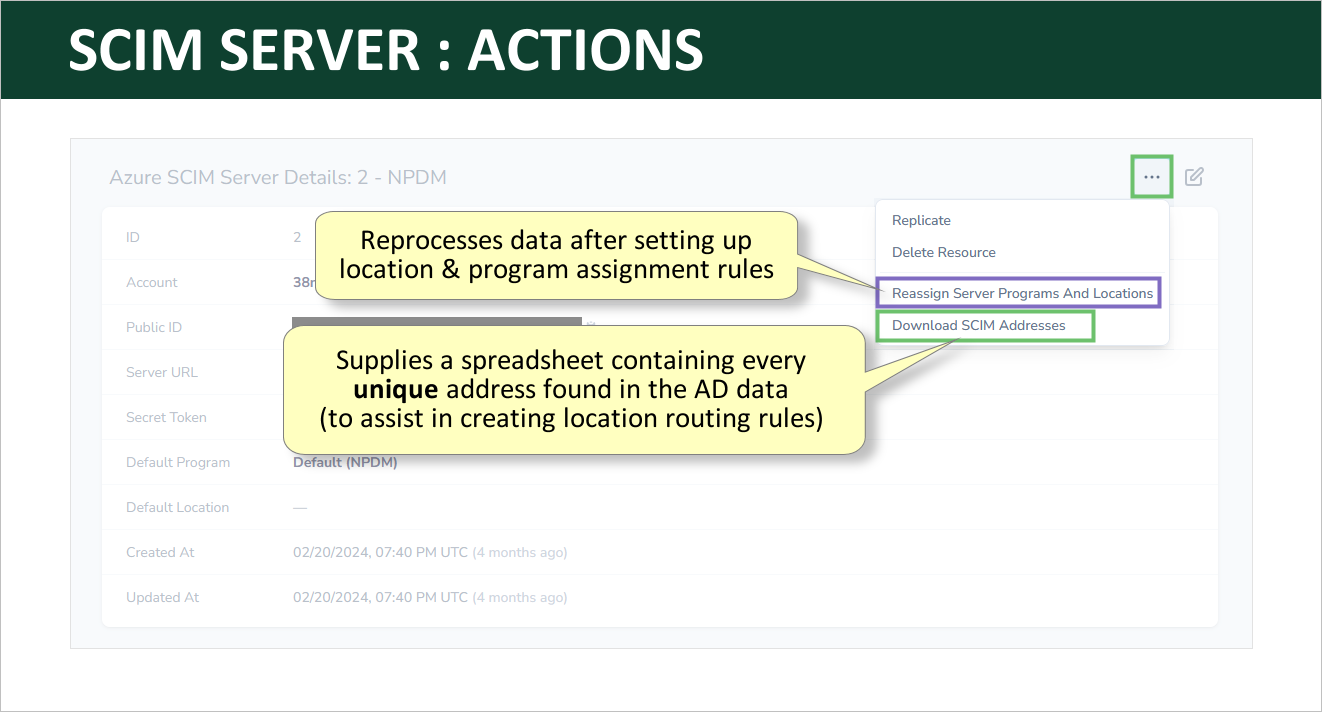
SCIM Server Actions
The following screen-capture illustrates two actions, one for use before setting up the location routing rules (download SCIM addresses) and the other to be used after completing the location and program routing rules (Reassign Server Programs and Locations):
Related docs
SCIM & Entra ID FAQ's
1. Should I use Microsoft 365 directory sync or Azure SCIM?
Use Microsoft 365 directory when a Global Administrator can grant consent and you want Dynasend to pull users and groups without building a SCIM provisioning job. Follow Microsoft 365 directory sync.
Use Azure SCIM when your organization already provisions apps with SCIM, or when you need Entra-side scoping and push schedules. Follow Entra ID provisioning.
If both are connected and cover the same email, SCIM owns that signature.
2. What do I need to do to provision Entra ID (Azure AD) to connect to Dynasend with SCIM?
Complete instructions are found here.
3. After deleting a user from Entra ID (Azure AD) they still appear in Dynasend. Why is this?
Azure SCIM: As explained in this Microsoft article, deletions of resources (users in our case) that you make in Entra ID (Azure AD) are automatically "soft-deleted" for 30 days. During this time period, the user will continue to appear in the Dynasend database. After 30 days has passed, the user will automatically become "hard-deleted" from your Entra ID (Azure AD), at which time they will also be removed from the Dynasend database.
Microsoft 365 directory: Dynasend applies removals on the next successful Graph sync after Entra reports the user gone. Soft-deleted Entra users may still appear until Entra hard-deletes them or Graph stops returning them.
4. How can I transmit non-standard data to Dynasend in my data feed?
To keep the provisioning process simple, we utilize standard data definitions by default. This means that you do not need to do anything special to transmit basic data:
- email address
- name
- title
- location
- phone number
- mobile number
- fax number
However, in some cases there may be one or more additional data elements that you store in AD, and that are also needed by the email signature. If this is the case, additional data items can be transmitted to us via the following procedure:
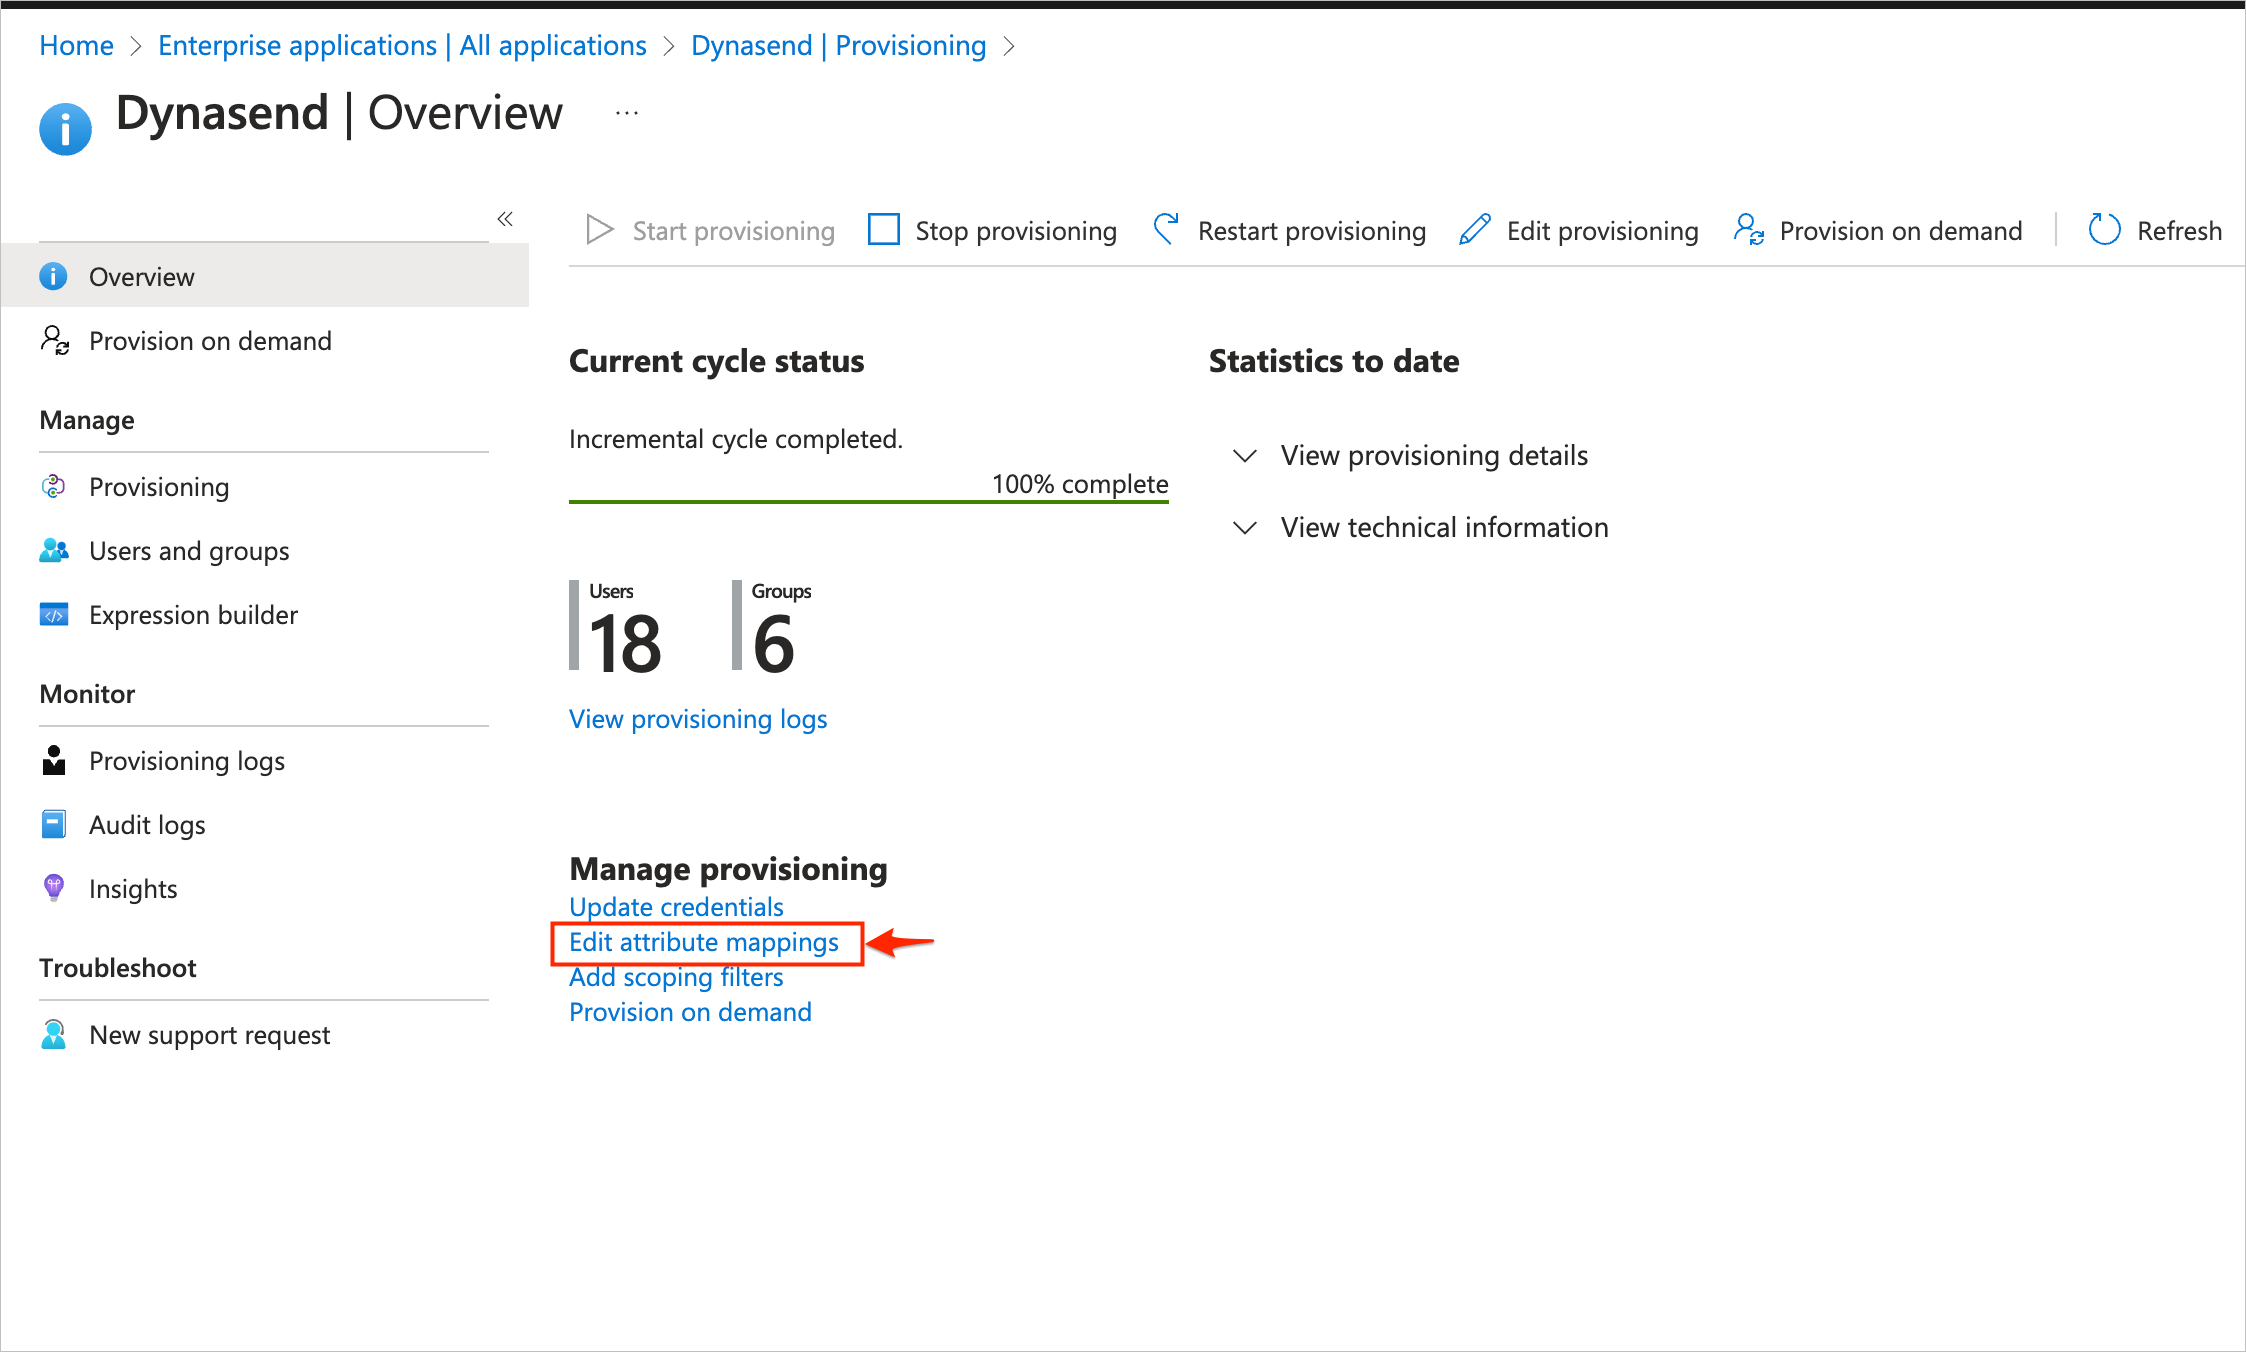
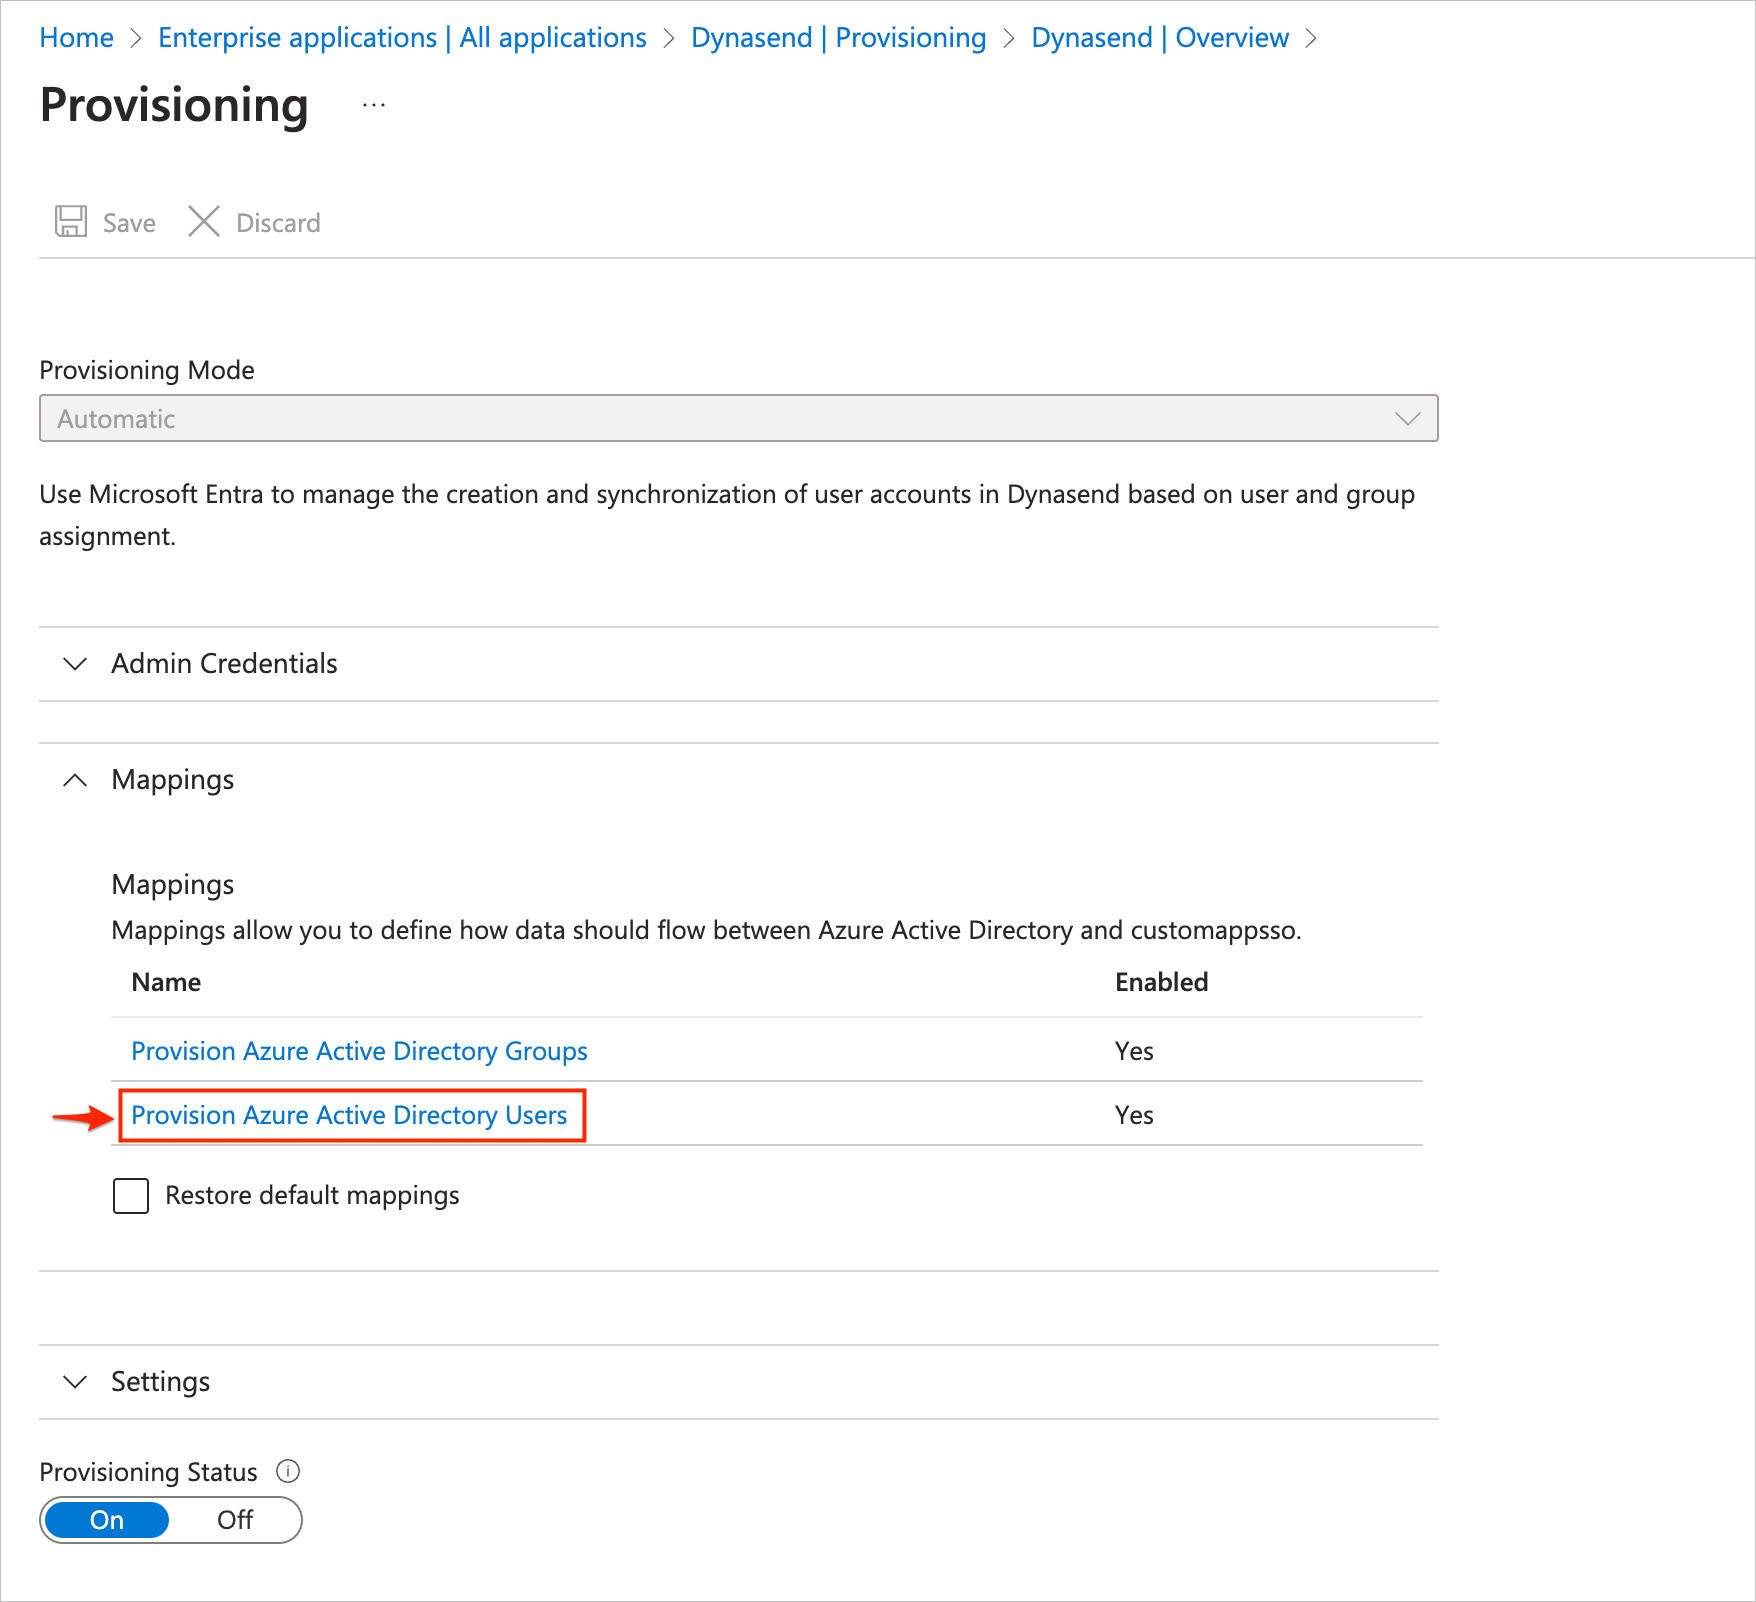
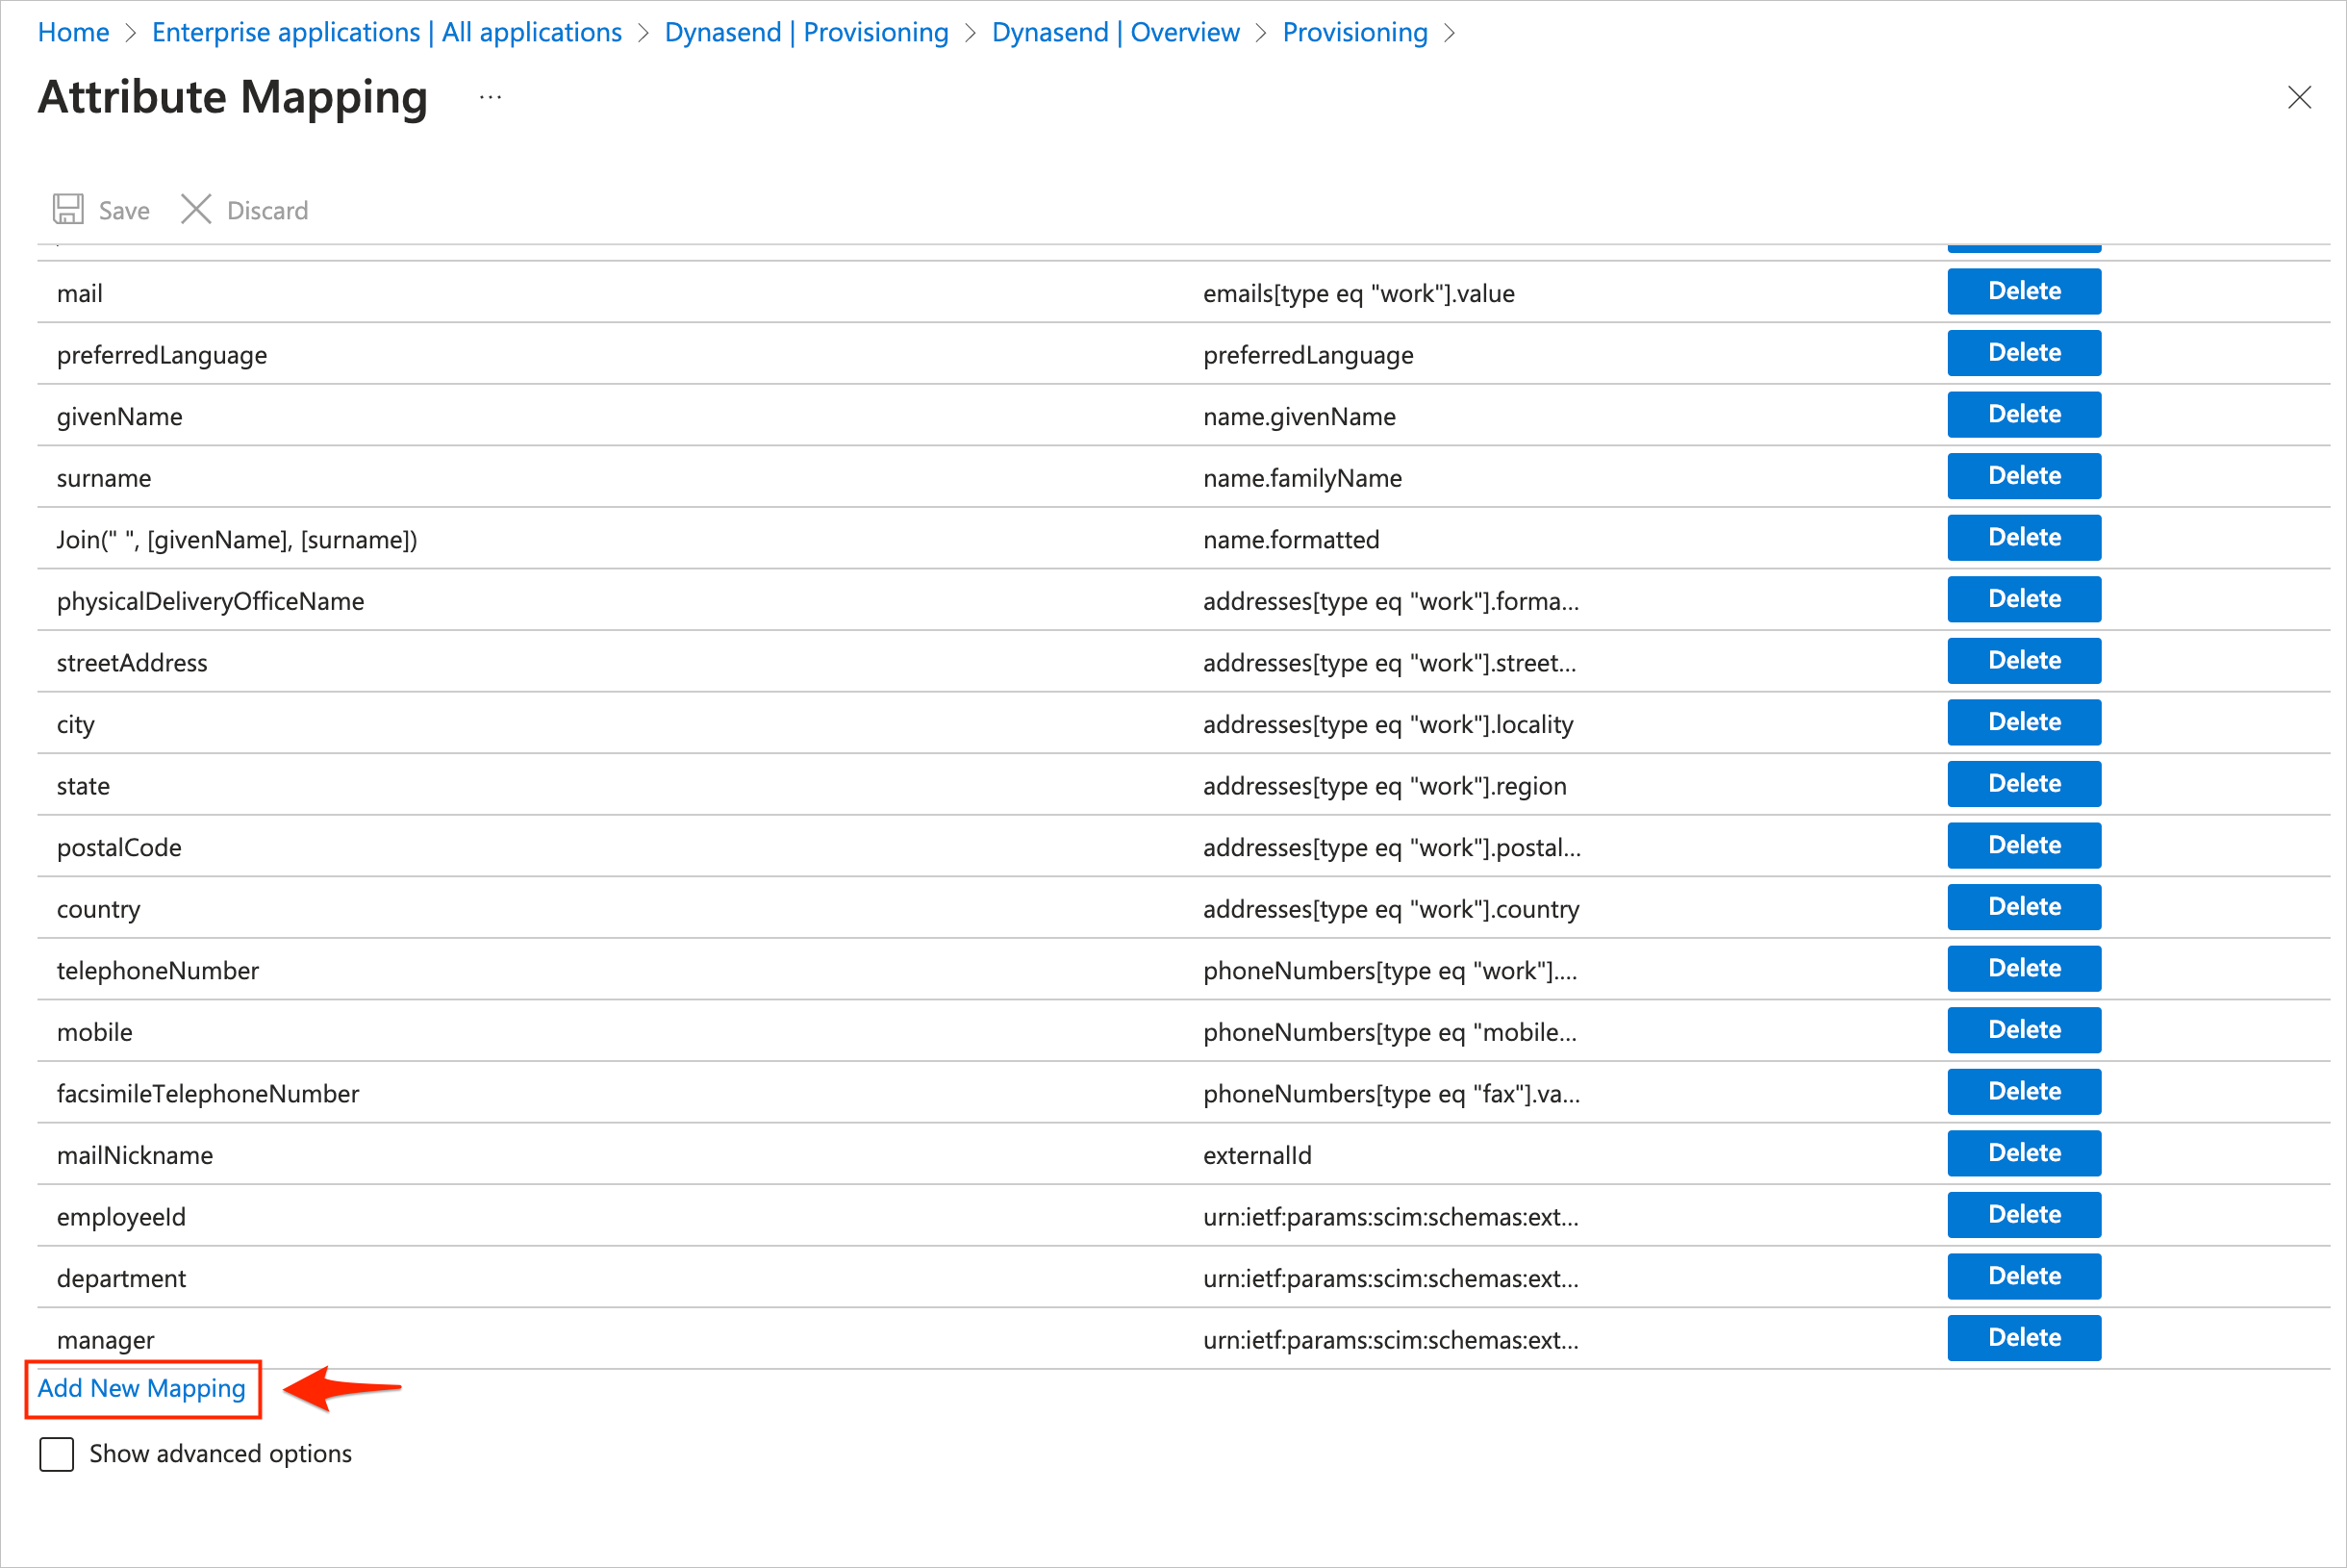
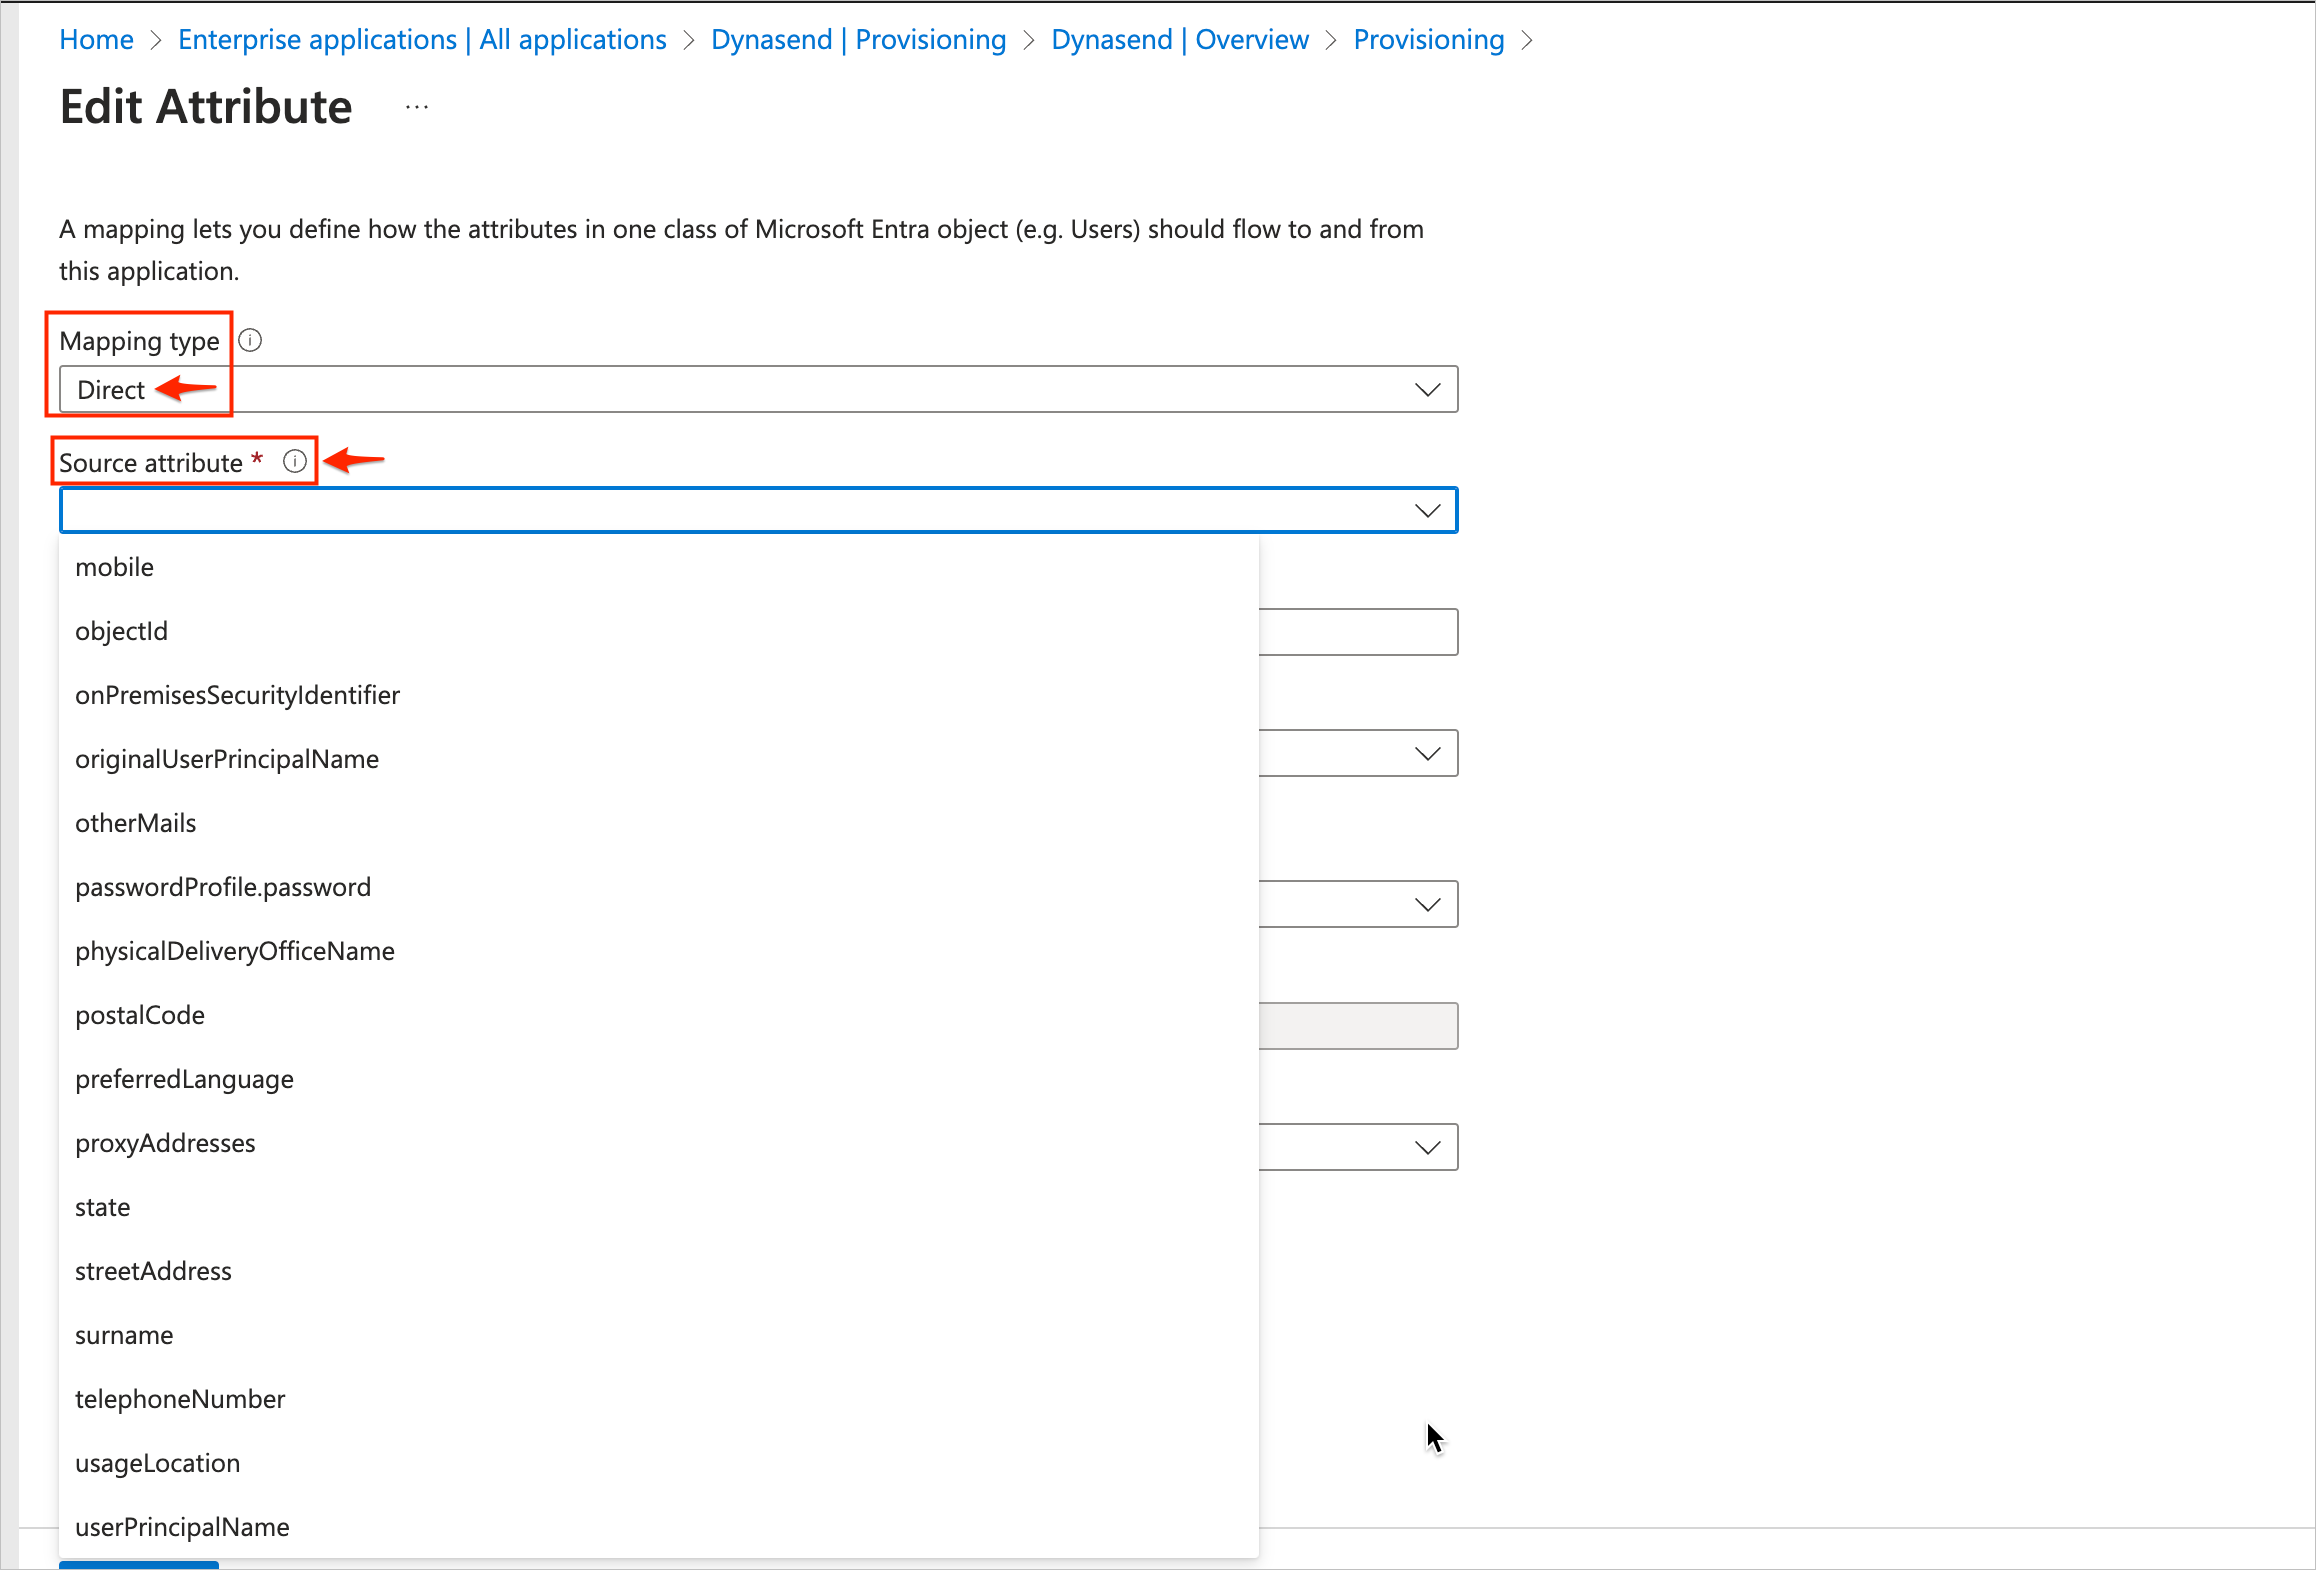
Once you have reached the Edit Attribute screen, you'll want to select "Direct" as the mapping type.
Then, from the "Source attribute" dropdown, select the data item that you wish to include in the data feed.
Next, from the "Target attribute" dropdown, select something that is otherwise not in use.
Note: The match does not have to be logical, the goal is simply to get the data to us. So, for example, if you want to map the user's "Bio URL" from your AD to the target attribute, "timezone", that's fine. We will understand that that's how you've set up the mapping and we will accommodate on our end.
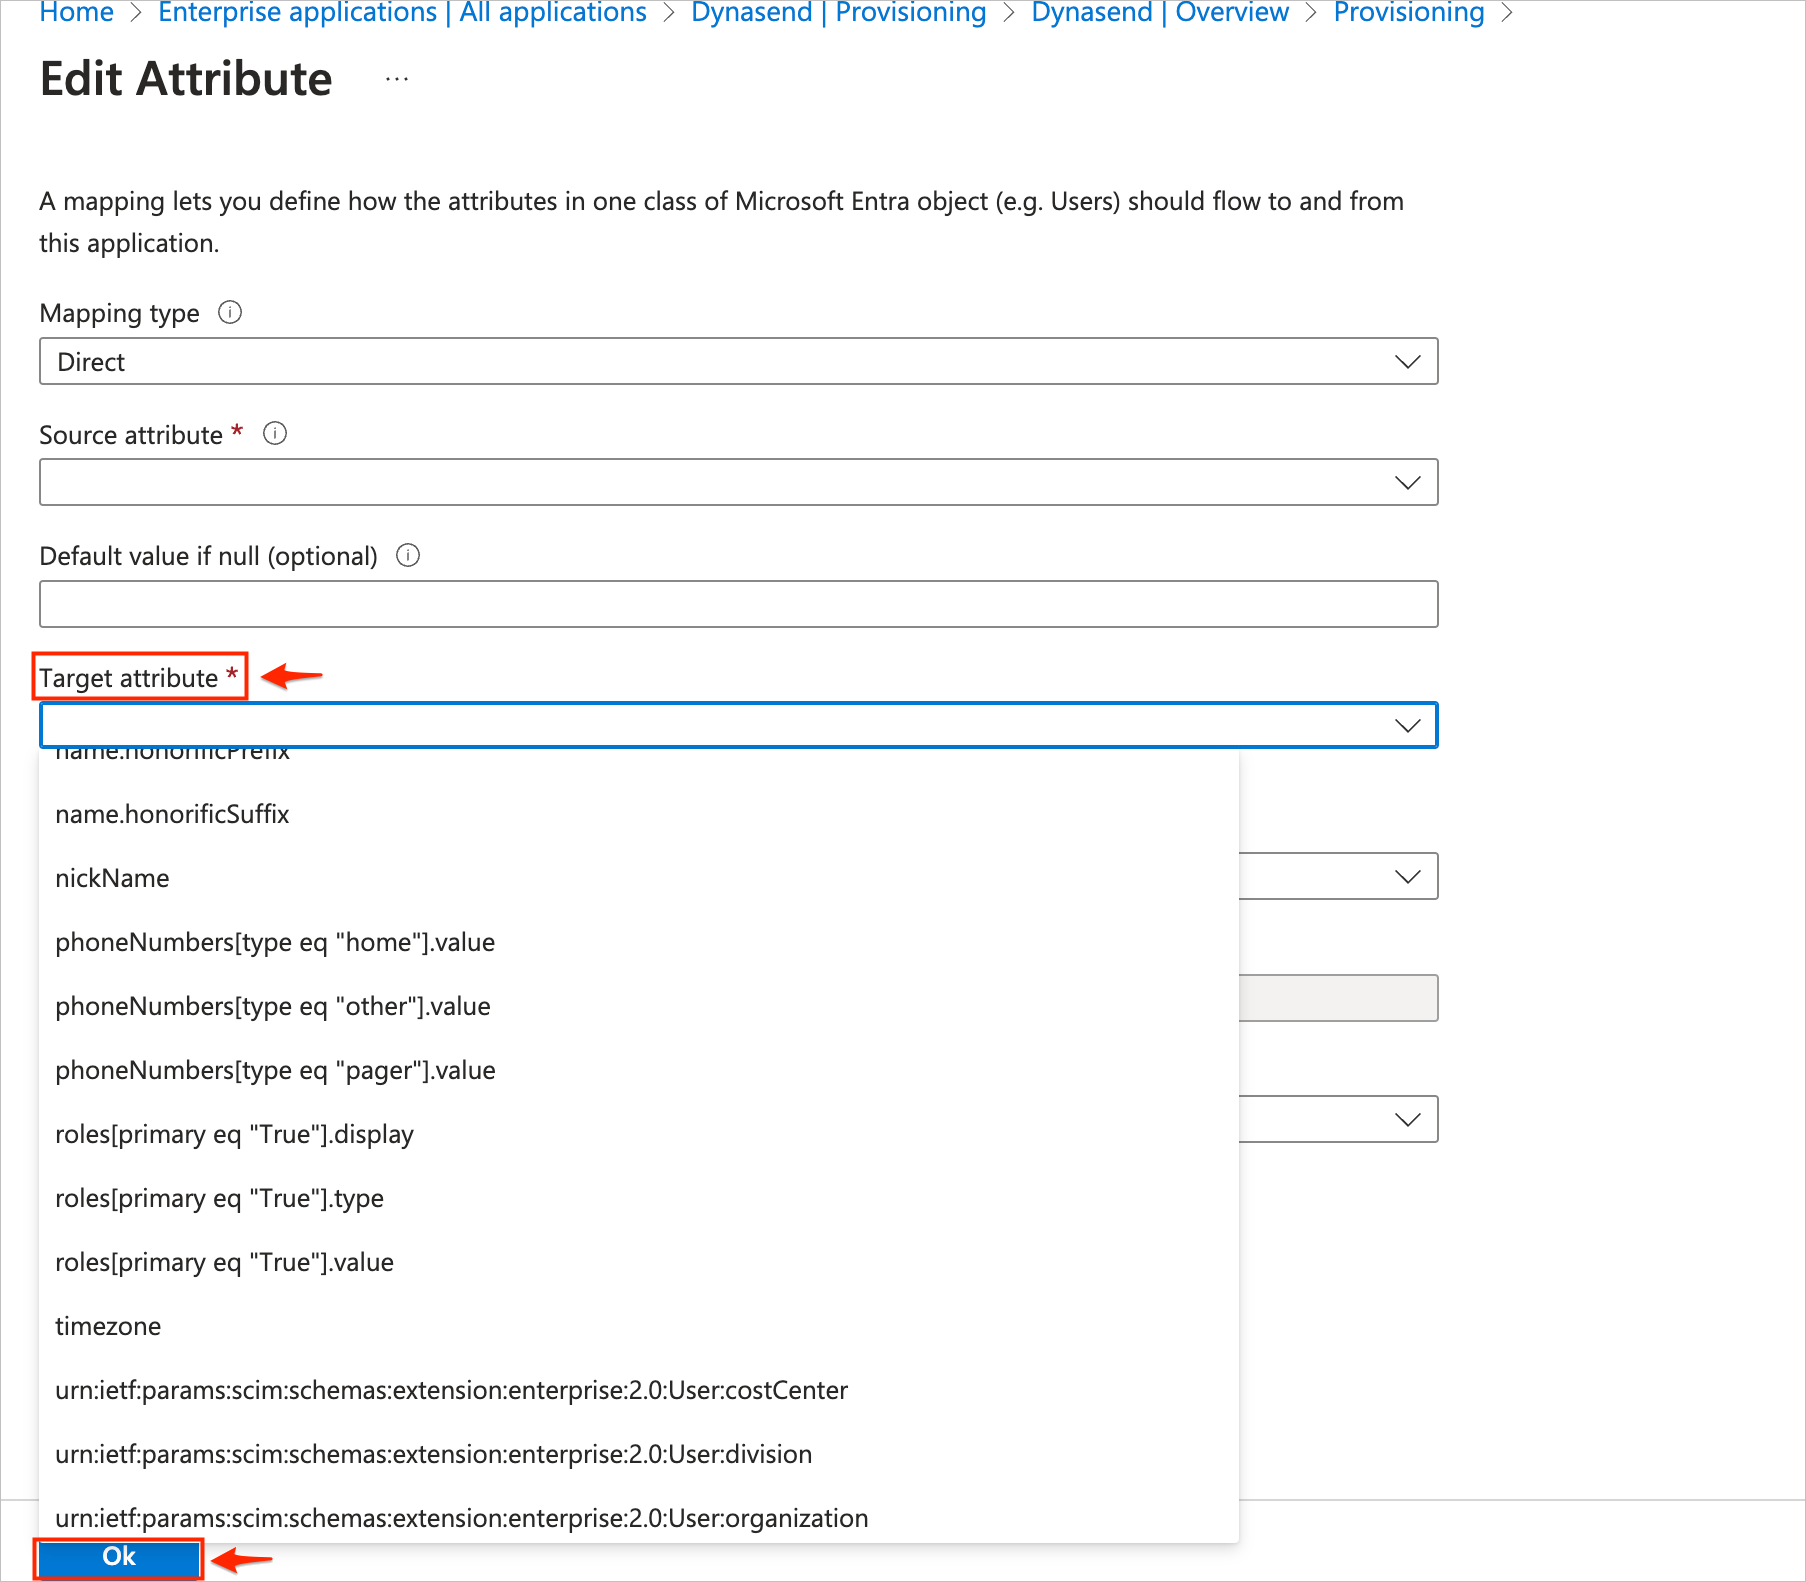
Click OK at the bottom when done.
5. Is there a way of directly syncing non-standard data?
Yes, custom data fields can be synced directly by editing your data mapping.
- Note #1: Custom fields should be namespaced with
urn:ietf:params:scim:schemas:extension:custom:2.0:User.
The following graphics illustrate the process, using the field "OwnershipLevel" as an example.
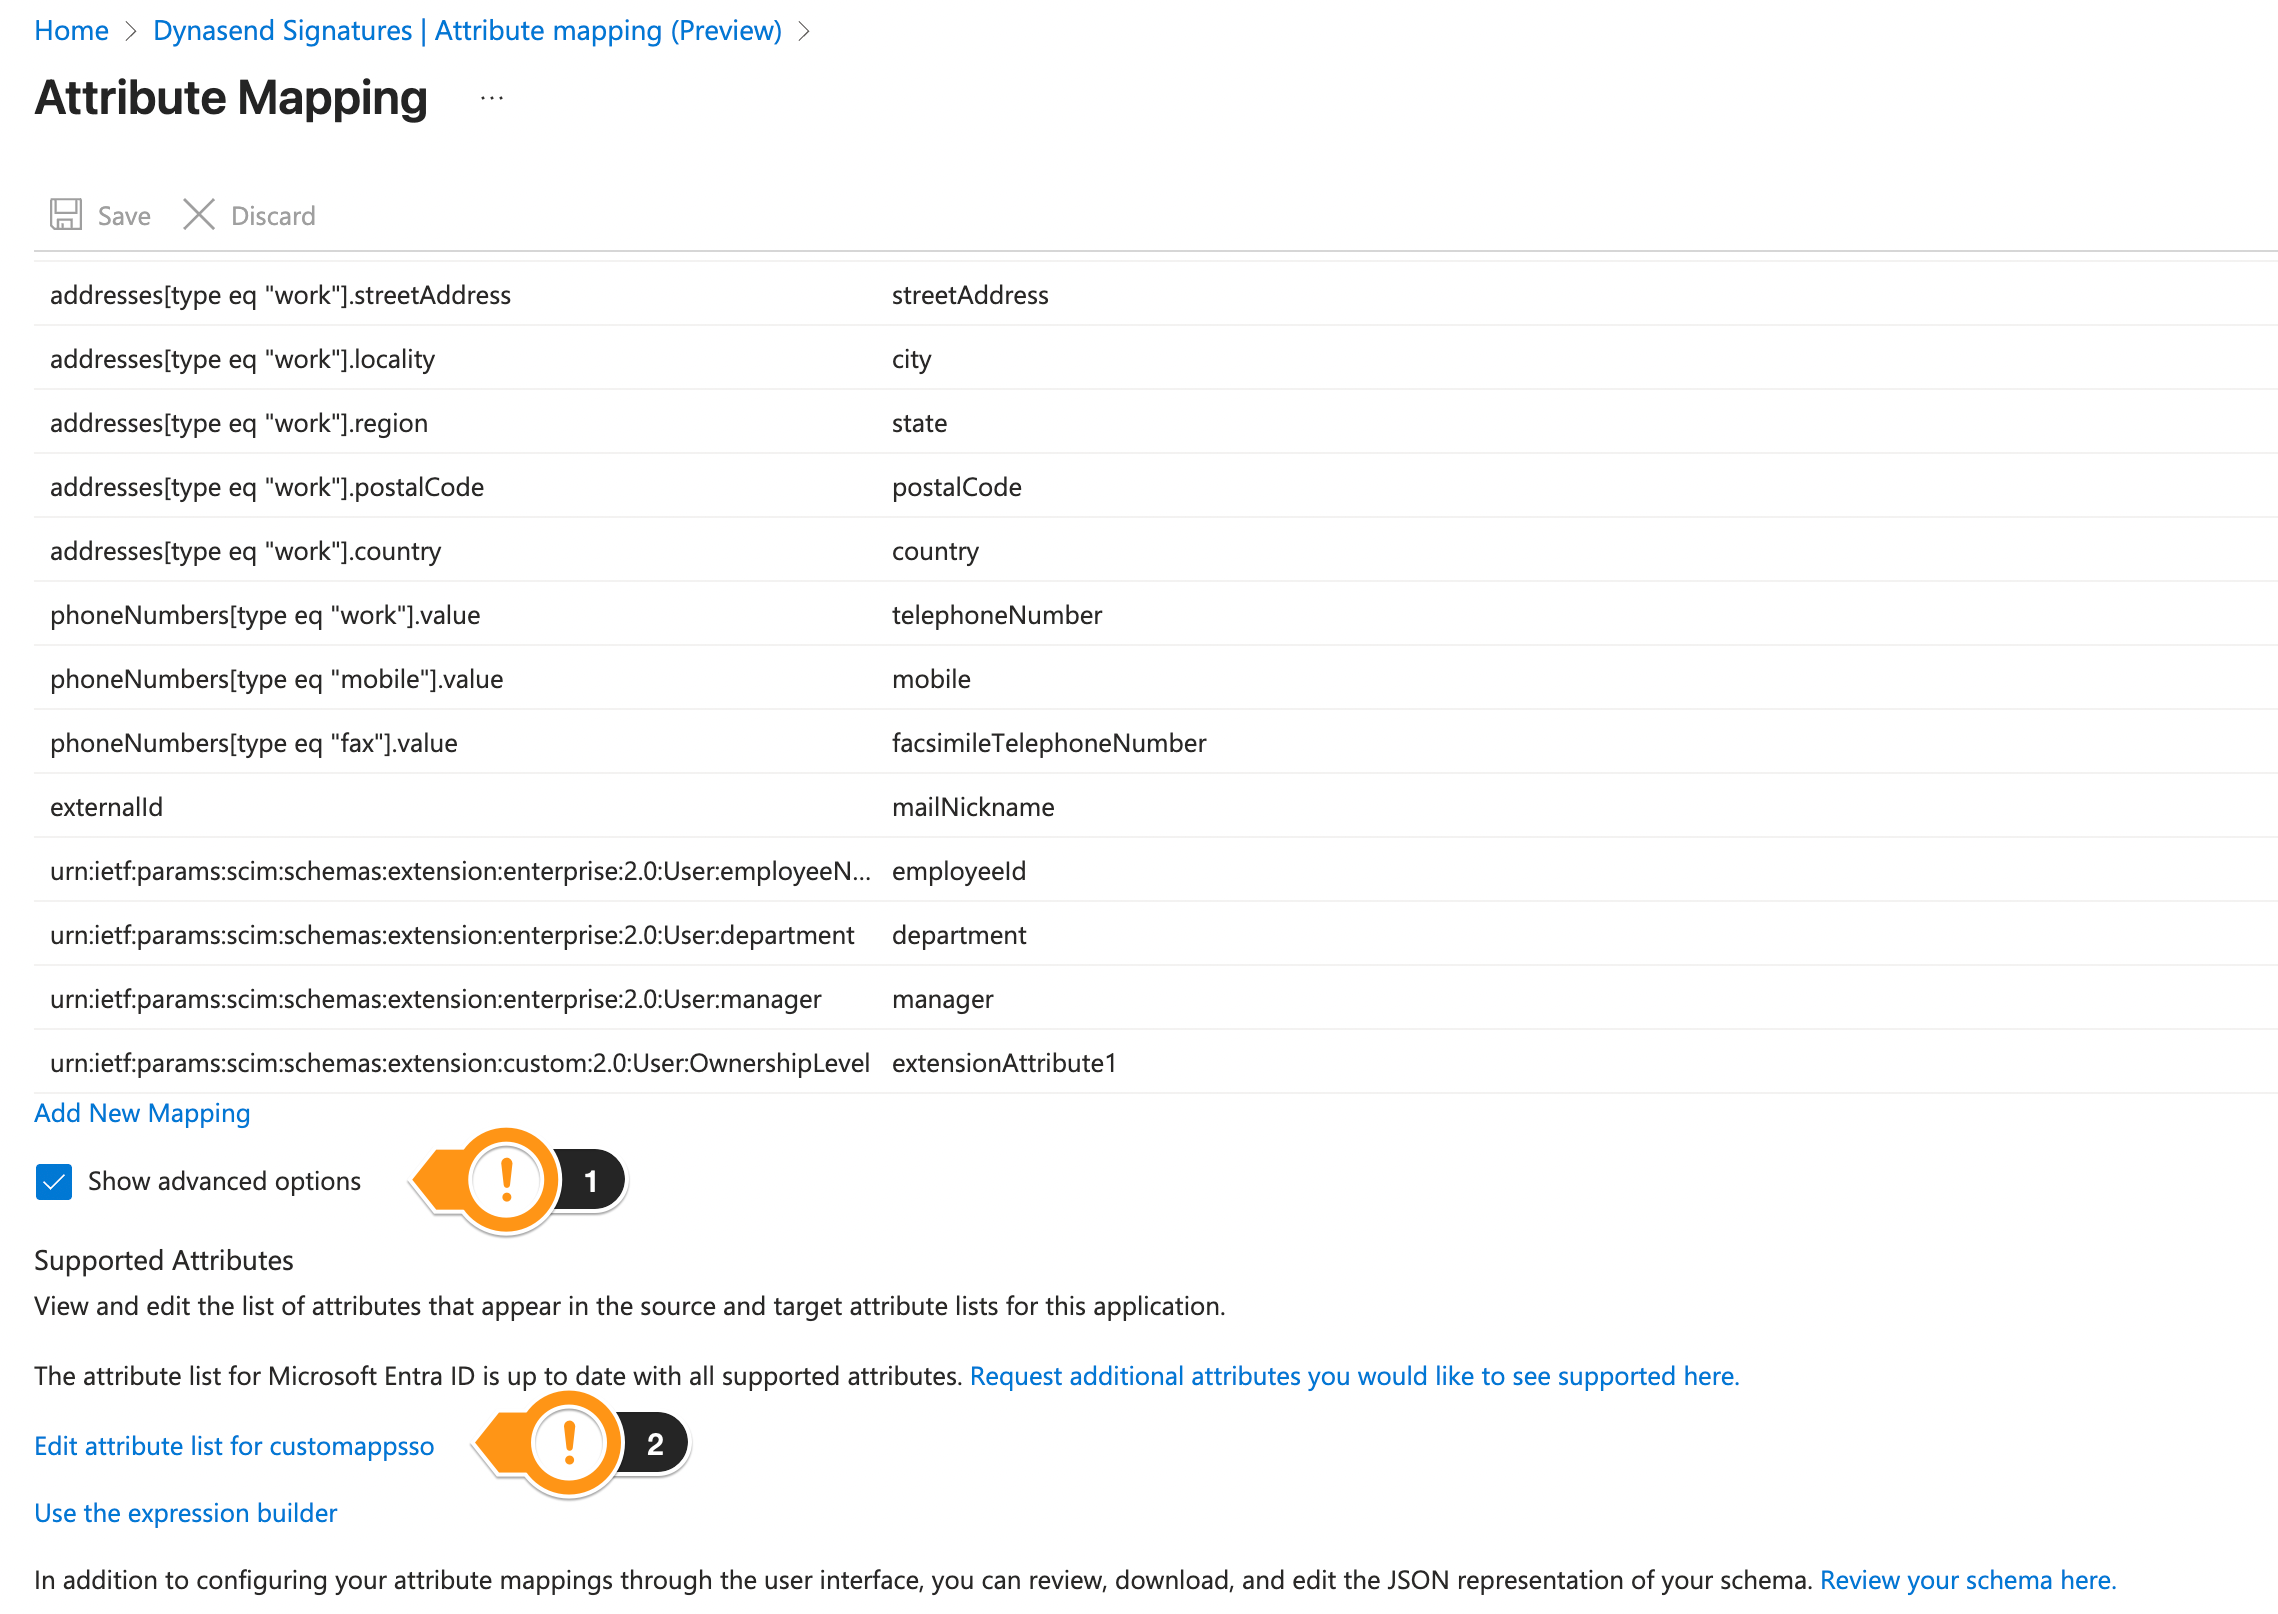
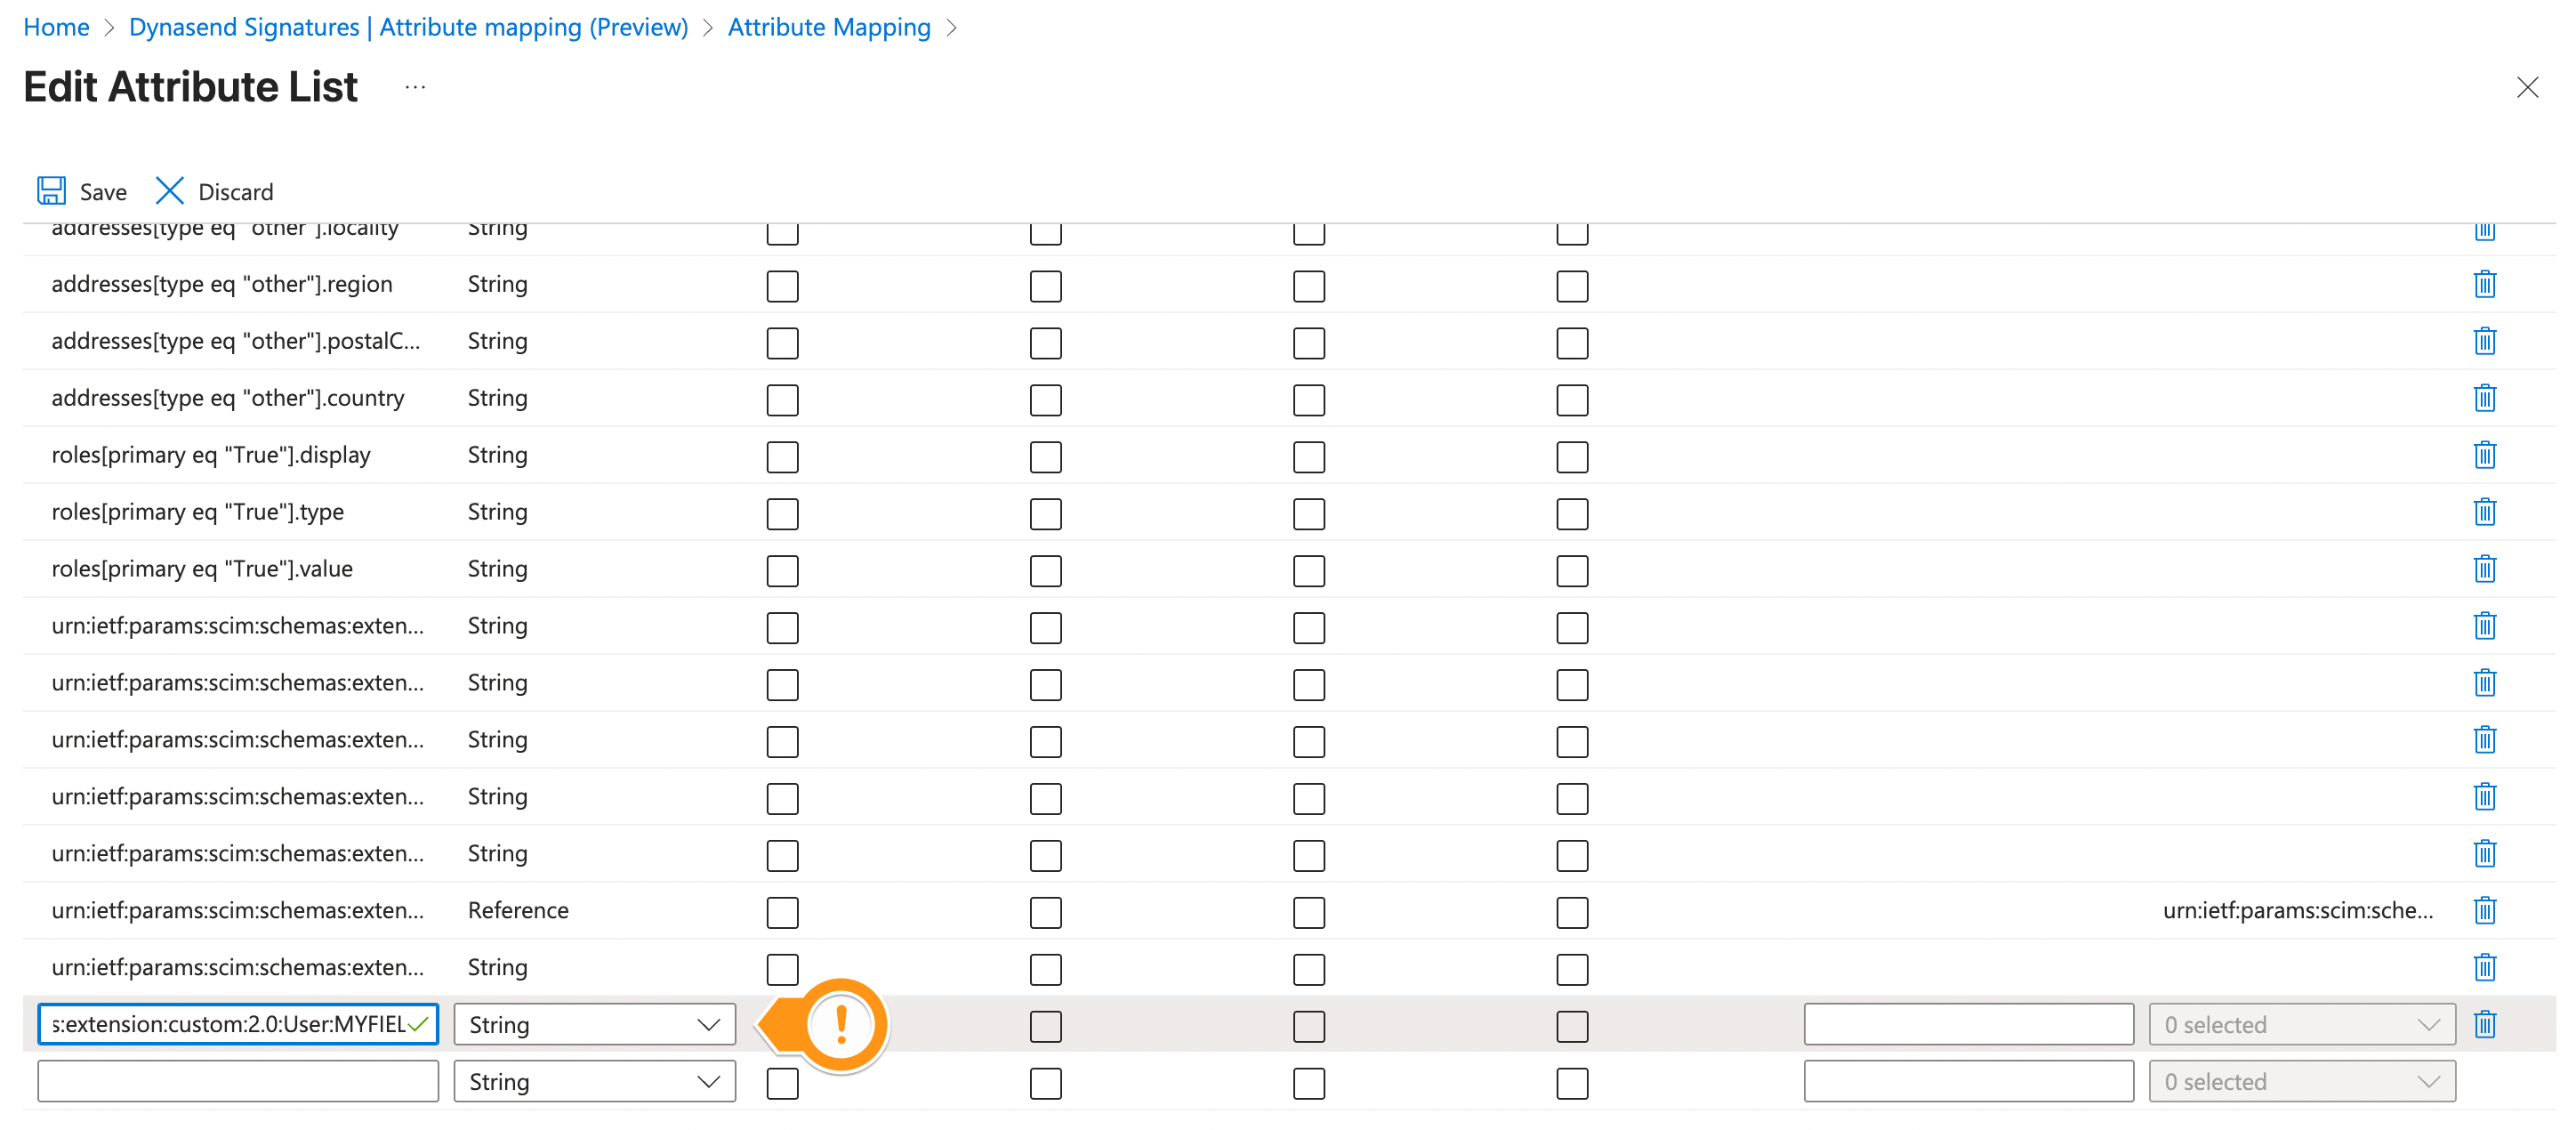
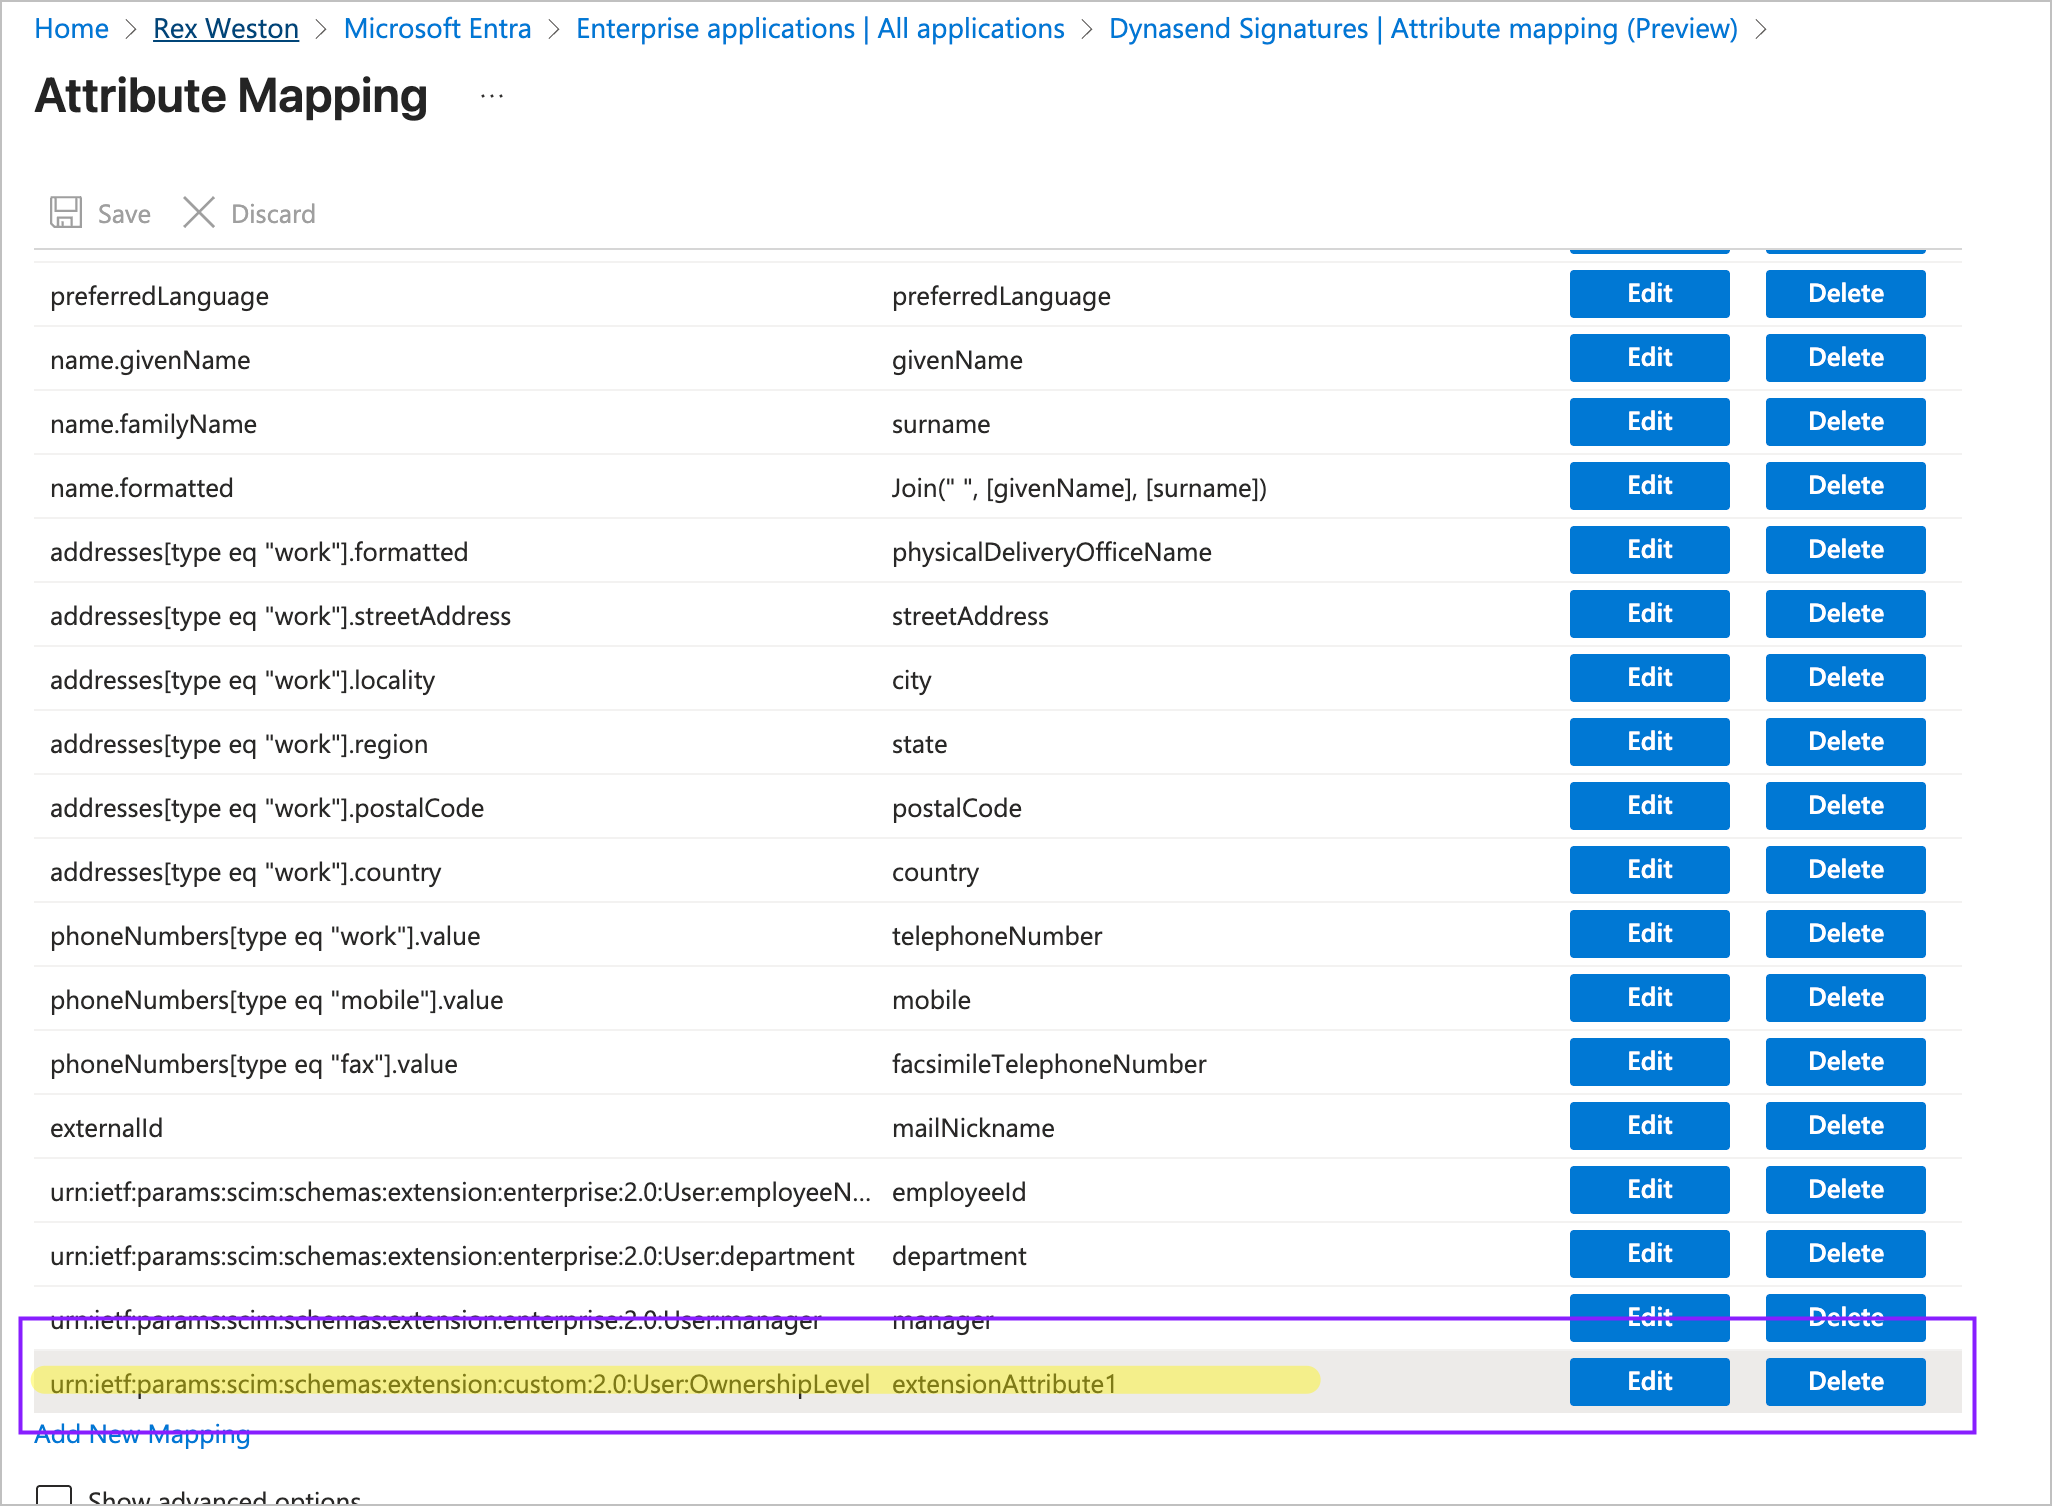
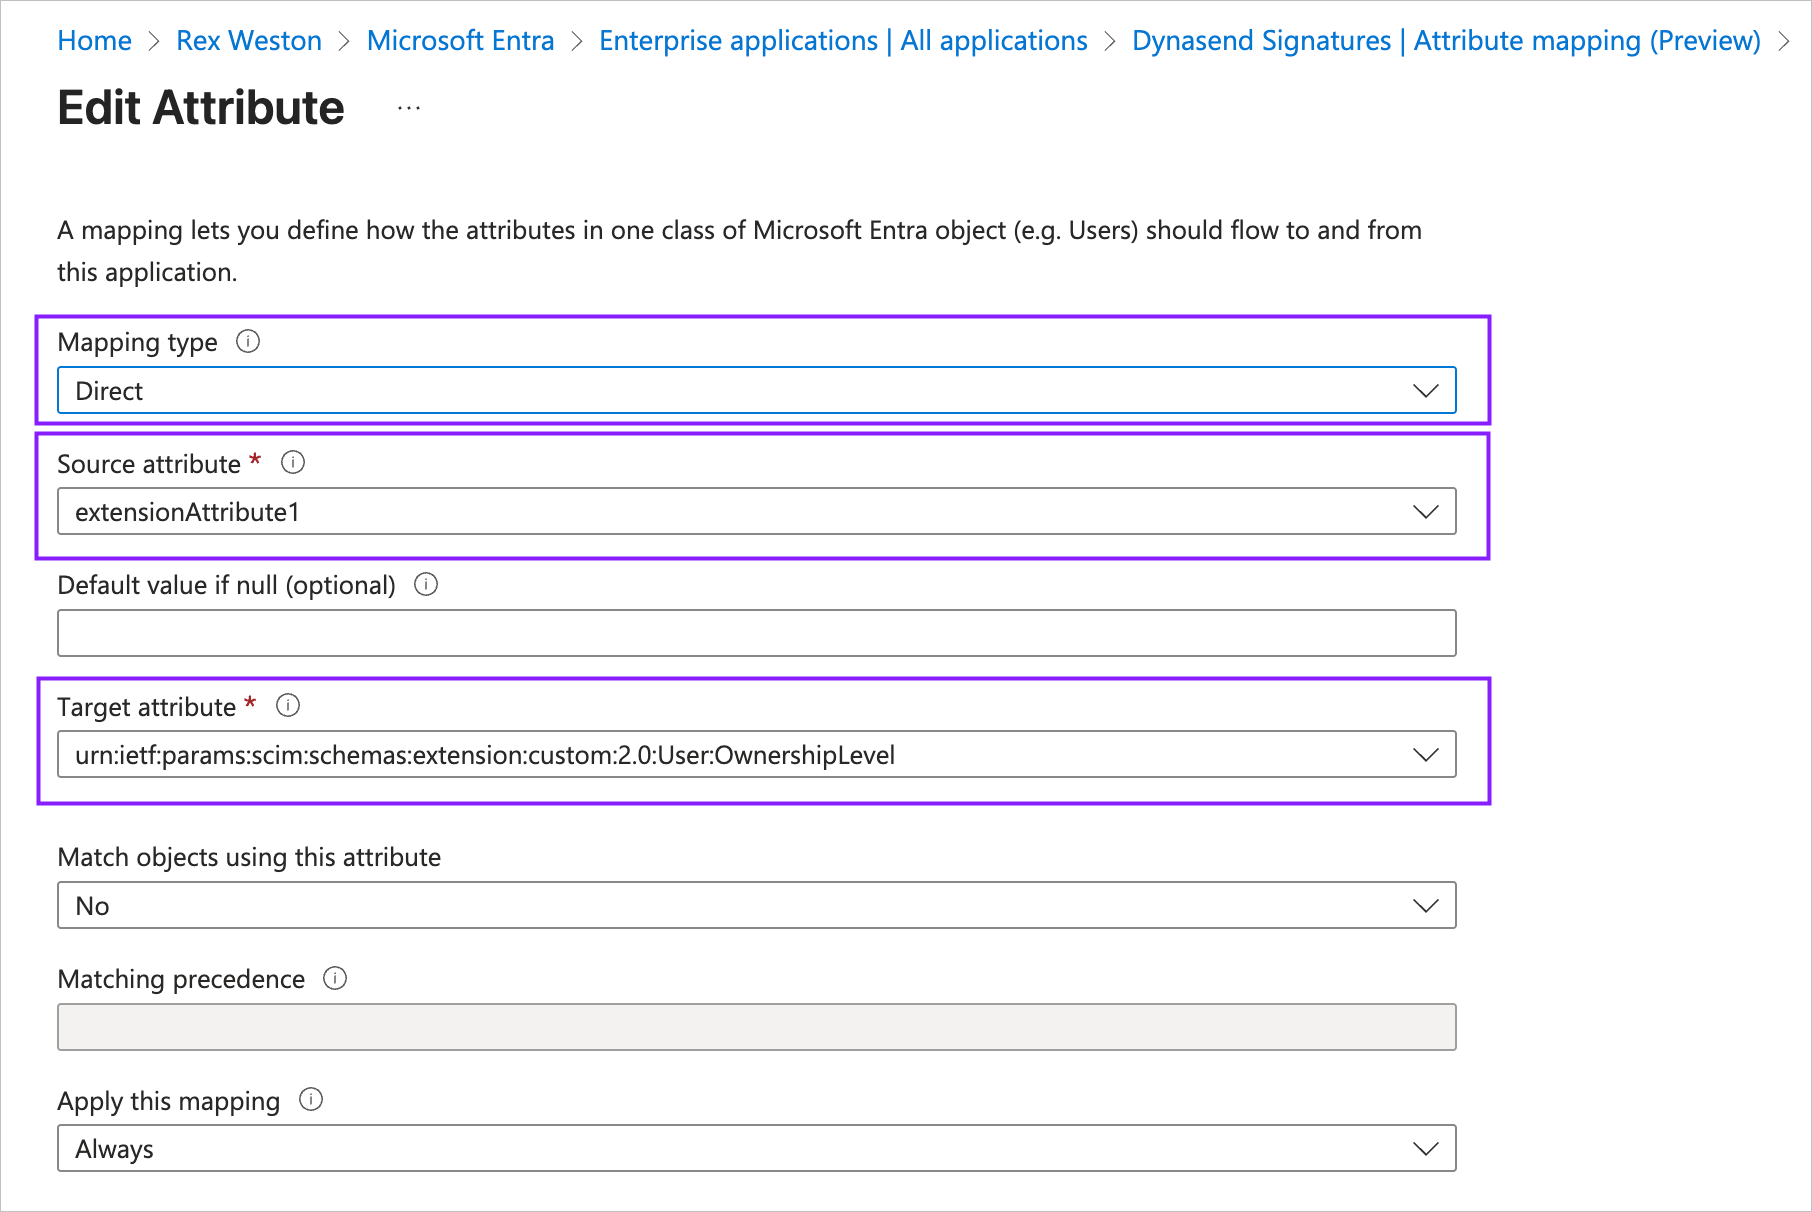
In this example, OwnershipLevel was added and we need urn:ietf:params:scim:schemas:extension:custom:2.0:User:OwnershipLevel.
First, edit the attribute list for customappsso. Define the new field as a String. Then you can go back to Attribute Mappings and add a new mapping. The source should be one of your extensionAttributeX and the target attribute choose the newly declared field.
- Note #2: We need to be notified of the custom attribute you are adding so that we can add it to our field mapping registry. Please email us here and we will set this up so that we can properly receive your custom data.
6. I have provisioning set up but my user data is not flowing to Dynasend?
To make all users visible to Dynasend, this final step in the provisioning process must be taken.
Note: If you don't already have an Active Directory group containing all mailbox users, create a group in Active Directory called "Dynasend" or "All Users" and add all mailbox users to it. Then wait for that group to sync up to Azure.
Then, within Azure, for the Dynasend service principal under that Provisioning section, click USERS AND GROUPS and then click ADD USER/GROUP and then add this group of all users from Active Directory:
This will complete the process of sending data on all users to Dynasend. If you continue to have problems, these two resources may be helpful:
Microsoft Article - No users are being provisioned
7. Can we scope SCIM and SSO to only certain Azure AD groups?
Yes to both.
When you connect your AD with our system using SCIM provisioning, you can scope it per user/group.
As for SSO, if you use OAuth is domain scoped, but if you use SAML (using Azure) you can also control provisioning by user/group.